

Golgi Fluorescent Staining: Principles, Probe Selection, Workflow, and Troubleshooting
Cell staining of the Golgi apparatus is widely used in fluorescence-based cell analysis because the Golgi is not just another intracellular landmark. It sits at the center of membrane trafficking, cargo processing, and intracellular organization, so changes in Golgi appearance often carry more interpretive weight than a simple position marker. In many imaging workflows, researchers do not only want to confirm that a Golgi-like structure is present. They want to understand whether the Golgi remains compact and perinuclear, whether it appears dispersed after treatment, whether it can be distinguished cleanly from endoplasmic reticulum-like background, and whether the observed signal supports structural interpretation or a broader trafficking-related conclusion. That is why Golgi fluorescent staining needs to be approached as a workflow decision rather than a purely decorative labeling step. In practice, Golgi staining often becomes most valuable when it is integrated into cell imaging workflows that also include nuclear, ER, lysosomal, membrane, or cytoskeletal channels. Under those conditions, the Golgi channel provides spatial context that can strengthen intracellular interpretation, but only if the staining strategy is matched to the experiment rather than chosen by familiarity alone. Researchers who need a broader comparison of organelle labeling strategies can also explore organelle cell staining, while users evaluating reagent options for this workflow may review golgi fluorescent probes.
What Is Golgi Fluorescent Staining?
Golgi fluorescent staining refers to the use of fluorescent dyes, fluorescent probes, fluorescently labeled antibodies, or genetically encoded fluorescent markers to visualize the Golgi apparatus in cells under fluorescence imaging. The purpose is usually to reveal Golgi position, morphology, compactness, distribution, and spatial relationships with other intracellular structures. In real laboratory workflows, Golgi fluorescent staining is rarely used as an isolated organelle label. It is usually introduced because the Golgi apparatus provides a high-value readout for intracellular organization, membrane trafficking, treatment response, or organelle interaction analysis. This makes the Golgi channel analytically useful, but it also means the staining result should be interpreted in light of probe mechanism, sample handling, and image acquisition design.
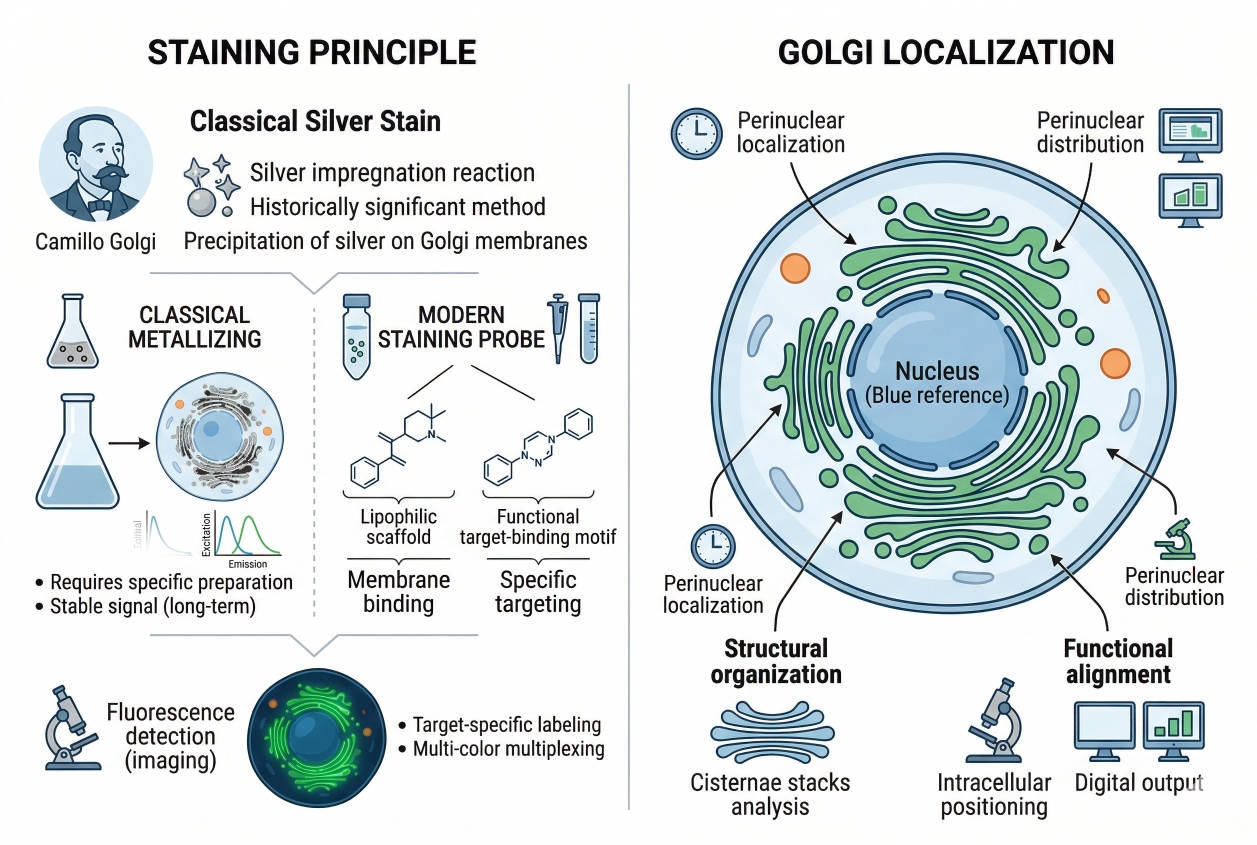 Fig. 1. Golgi fluorescent staining highlights perinuclear organization (BOC Sciences Authorized).
What Golgi fluorescent staining is used to visualize?
Golgi fluorescent staining is primarily used to visualize the characteristic perinuclear Golgi region, its ribbon-like or compact morphology, and its relationship to the broader endomembrane system. Depending on the model and staining approach, researchers may compare whether the Golgi remains condensed near the nucleus, becomes fragmented, appears redistributed, or changes its spatial relationship to other organelles after a defined perturbation. This makes Golgi staining particularly valuable in experiments that rely on intracellular architecture as part of the biological interpretation rather than as a secondary descriptive observation.
What this readout can and cannot tell you?
A Golgi fluorescent signal can support strong structural conclusions when the labeling method is well matched to the sample and the imaging question. It can help determine whether the Golgi is visible, where it is located, and whether its overall morphology appears altered between conditions. At the same time, Golgi staining alone usually cannot explain why the morphology changed, whether the difference reflects altered trafficking, or whether part of the visual shift arose from fixation, probe redistribution, or optical settings. This is why Golgi fluorescent staining should be treated as a carefully defined imaging readout rather than a self-sufficient mechanistic answer.
Why Golgi fluorescent staining is more than a simple organelle label?
The Golgi apparatus is deeply tied to membrane processing and cargo flow, so changes in Golgi appearance often attract more interpretive attention than many other routine organelle labels. A convincing Golgi image may seem straightforward, but the meaning of that image depends on whether the signal came from a live-cell dye, a ceramide-derived probe, a cis-Golgi antibody such as GM130, a trans-Golgi marker such as TGN46, or a fluorescent protein-based targeting construct. Each approach offers different strengths in terms of live-cell compatibility, regional specificity, fixation tolerance, and susceptibility to background. For that reason, Golgi fluorescent staining is most reliable when researchers define their intended readout first and only then decide how to generate the signal.
Need help selecting the right Golgi fluorescent staining strategy?
We can help compare live-cell Golgi dyes, ceramide-based probes, antibody markers, and multicolor channel options according to your assay goal and imaging workflow.
Why Golgi Fluorescent Staining Matters in Cell Imaging?
Golgi fluorescent staining matters because the Golgi apparatus provides one of the most informative intracellular structural readouts in fluorescence microscopy. It is not only a visible organelle cluster near the nucleus. It is also a central component of intracellular trafficking logic, membrane sorting, and organelle organization. As a result, the Golgi channel can strengthen interpretation in comparative imaging experiments, multicolor panel design, and morphology-focused workflows when it is used with clear experimental intent.
- Golgi as a spatial landmark in intracellular imaging: In many cell types, the Golgi appears as a compact or ribbon-like perinuclear structure that helps orient the intracellular architecture of the image. This makes it useful as a reference point when researchers want to assess how organelles, vesicular signals, or trafficking-associated changes are distributed in the cytoplasm.
- Why Golgi fluorescent staining is useful in trafficking-related studies: Because the Golgi sits at the center of cargo processing and membrane transport pathways, its appearance often becomes relevant when researchers want to interpret intracellular redistribution, secretory pathway stress, or broader membrane system reorganization. In these workflows, the Golgi channel can support structure-aware interpretation of trafficking-associated phenotypes.
- The value of Golgi staining in multicolor organelle analysis: Golgi staining becomes especially informative when combined with nuclear staining, ER staining, lysosomal staining, membrane staining, or cytoskeletal channels. In such panels, the Golgi does not operate as a standalone signal. Instead, it contributes one spatial layer within a broader organelle map that helps users determine whether intracellular organization remains coordinated or appears altered.
- Why Golgi morphology can add value in comparative treatment studies: In side-by-side treatment comparisons, researchers may not only compare intensity but also compactness, continuity, dispersal, and region-specific organization of the Golgi apparatus. These morphology-linked observations become more trustworthy when staining logic, acquisition settings, and control conditions are held constant across all groups.
Core Principles Behind Golgi Fluorescent Staining
The core principle behind Golgi fluorescent staining is that not all Golgi signals are generated in the same way, and not all visible Golgi-like patterns should be interpreted with the same confidence. Some methods emphasize rapid live-cell visualization, some improve structural localization after fixation, and some are more useful for distinguishing subregions of the Golgi apparatus. The most reliable workflows begin by understanding what creates the signal and what practical limits come with that mechanism.
- How Golgi-selective fluorescent probes generate signal: Many live-cell Golgi staining approaches rely on fluorescent small molecules or lipid-associated probe logic that promotes enrichment in the Golgi region. In practice, this means the final image can be influenced by loading conditions, membrane context, incubation timing, wash intensity, and cell state. The visible signal is therefore a product of both probe design and workflow handling.
- Golgi fluorescent dyes vs Golgi marker antibodies: Small-molecule Golgi dyes are often favored for rapid live-cell staining or straightforward structural visualization, while antibody-based Golgi markers are more often selected for fixed-cell analysis where region-specific structural interpretation is more important. Antibody markers such as GM130, Giantin, and TGN46 can be more suitable when the experiment depends on stable post-fixation localization or when researchers want to distinguish Golgi subcompartments more clearly.
- Why fixation, permeabilization, and handling affect Golgi readout: Golgi morphology can be sensitive to sample processing. Fixation strength, permeabilization strategy, wash sequence, and delay before imaging can all affect whether the Golgi appears compact, fragmented, or poorly defined. This means a visible signal after fixation is not enough by itself. Researchers must judge whether the staining still reflects the same structural meaning they intended to measure.
- Why Golgi and ER signals are sometimes hard to separate: The Golgi and ER belong to a connected membrane trafficking system, so incomplete selectivity or non-ideal staining conditions can produce ER-like background, diffuse reticular signal, or poorly resolved boundaries. In practical workflows, this becomes one of the most important interpretation challenges. A bright image is not automatically a Golgi-selective image.
- Why probe mechanism should guide interpretation: A change in Golgi fluorescence can reflect genuine structural reorganization, but it can also reflect staining inefficiency, altered retention, sample stress, or suboptimal optical balance with surrounding channels. Reliable Golgi interpretation therefore depends on documenting the staining mechanism together with the biological design.
Common Types of Golgi Fluorescent Staining Approaches
Golgi fluorescent staining methods are best grouped by workflow role rather than by product name alone. This makes selection more practical because researchers usually need to decide between live-cell imaging, fixed-cell structure analysis, trafficking-oriented observation, or multicolor compatibility. A flat reagent list rarely helps unless it is connected to what the assay actually needs to reveal. In most cases, the best Golgi staining approach is the one whose signal logic, sample compatibility, and interpretive value match the imaging question.
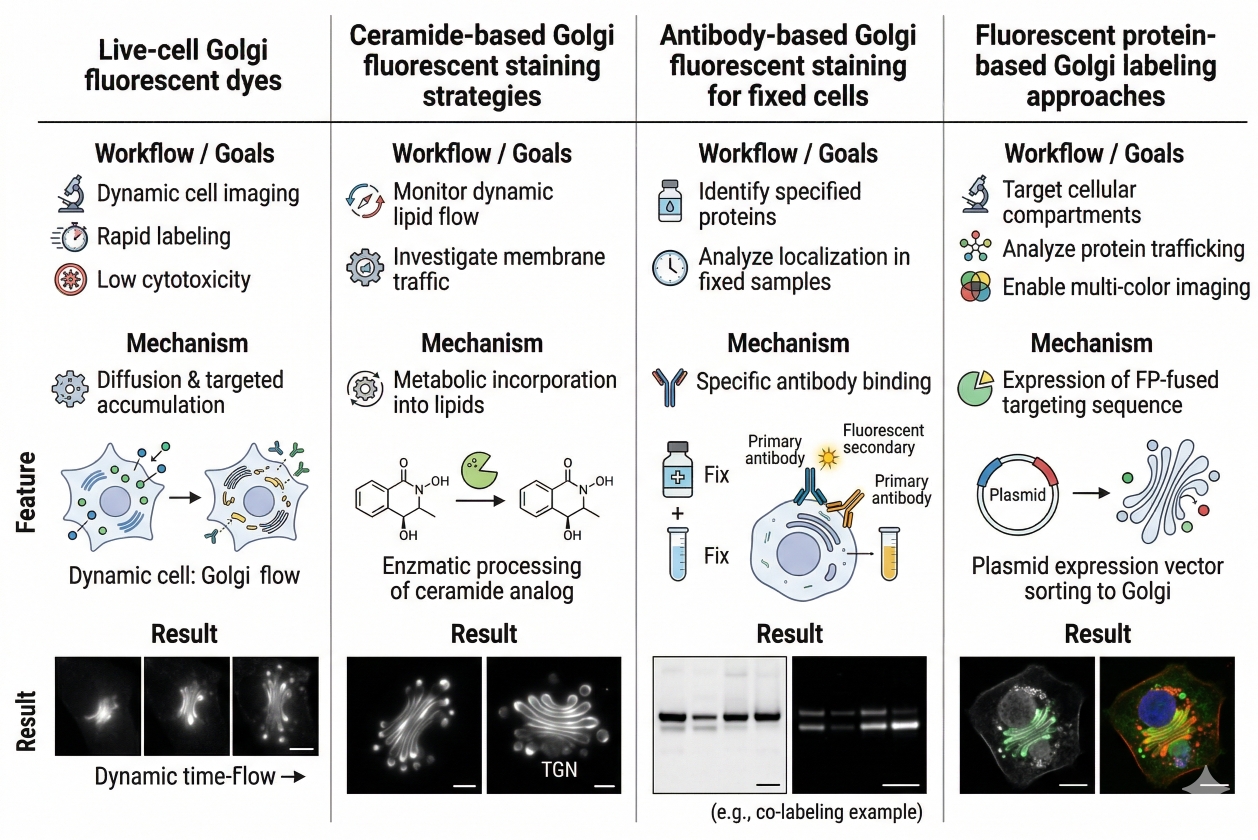 Fig. 2. Different Golgi staining approaches support different imaging goals (BOC Sciences Authorized).
Live-cell Golgi fluorescent dyes
Live-cell Golgi fluorescent dyes are often chosen when the main goal is to obtain a relatively quick and visually interpretable Golgi signal in intact cells. These dyes can be useful in short imaging workflows, co-staining experiments, and morphology checks where users want to confirm Golgi localization without committing immediately to a fixed-cell immunofluorescence workflow. Their main advantages usually include faster setup and easier integration into live-cell experiments. Their limitations are equally important: the signal may depend more strongly on loading conditions, incubation timing, and dye handling than many users initially expect. For that reason, live-cell Golgi dyes are most powerful when the experiment prioritizes structural visibility and well-controlled timing.
Ceramide-based Golgi fluorescent staining strategies
Ceramide-based strategies are among the most familiar approaches for Golgi fluorescent staining because ceramide analogs can provide a practical route to labeling Golgi-associated membrane structures. For example, NBD C6-Ceramide is directly relevant examples of fluorescent ceramide-type reagents that may be considered in Golgi-oriented imaging workflows. These types of probes can be useful when researchers want membrane-associated Golgi visualization, but they still require method-aware handling. The apparent clarity of a Golgi signal can be influenced by probe concentration, temperature, incubation sequence, wash conditions, and imaging delay. That is why ceramide-derived Golgi staining should be optimized as a workflow, not treated as an automatically interchangeable organelle label.
Antibody-based Golgi fluorescent staining for fixed cells
Antibody-based Golgi fluorescent staining is often the better choice when the sample is fixed and the user needs stronger structural interpretation, region-specific marker logic, or better compatibility with endpoint immunofluorescence analysis. Marker proteins such as GM130, Giantin, and TGN46 are useful because they can anchor the Golgi signal to known Golgi subregions rather than relying on probe enrichment alone. This can be especially important when the experiment needs to compare Golgi compactness, continuity, or regional organization across treatment groups. The tradeoff is that the quality of the result depends heavily on fixation, permeabilization, blocking, and antibody validation under the actual staining conditions used.
Fluorescent protein-based Golgi labeling approaches
Fluorescent protein-based Golgi labeling can be highly useful in live-cell workflows where researchers want dynamic observation, trafficking context, or repeated imaging over time. Compared with one-time dye loading, these strategies can offer more sustained targeting in appropriate systems, but they come with their own constraints, including transfection efficiency, expression balance, cell model suitability, and possible effects of overexpression on intracellular organization. In practice, fluorescent protein-based Golgi labeling is most attractive when the study design truly benefits from dynamic tracking or long-term live observation rather than simple endpoint visualization.
How to Choose the Right Golgi Fluorescent Staining Strategy?
Choosing the right Golgi fluorescent staining strategy begins with the question the experiment is actually trying to answer. Researchers should first decide whether they need a mainly structural readout, a live-cell Golgi image, a fixed-cell endpoint marker, or a multicolor panel-compatible channel that can support broader intracellular interpretation. Once that decision is clear, reagent choice becomes much more rational. The most common selection error is not choosing a weak probe. It is choosing a probe whose staining logic does not match the biological question.
Choose by sample type and staining condition
The first practical decision is whether the sample will be imaged live, fixed immediately after staining, or processed through a more conventional immunofluorescence workflow. Live-cell Golgi dyes and ceramide-type probes are often most useful when structural visualization is needed on intact cells with controlled timing. Fixed-cell workflows may benefit more from antibody markers when long-lasting structure interpretation, subcompartment awareness, or downstream image comparison is the priority. The correct choice depends less on popularity and more on whether the sample handling sequence preserves the meaning of the intended signal.
Choose by readout goal: localization, morphology, or trafficking context
If the goal is simple localization, a live-cell Golgi probe may be sufficient. If the goal is morphology comparison, region-specific structure analysis, or a stronger basis for endpoint image interpretation, antibody-based Golgi staining may be more appropriate. If the experiment is centered on trafficking context, dynamic movement, or organelle interaction over time, fluorescent protein-based approaches may deserve consideration. In other words, the probe should serve the readout, not force the readout into a preselected probe format.
Choose by channel allocation and multicolor compatibility
In multicolor imaging, Golgi staining has to fit around the rest of the panel. If the green channel already carries a priority reporter, then assigning the Golgi signal to green can create avoidable channel burden. Likewise, if the panel already contains membrane-rich or reticular channels, a Golgi dye prone to diffuse background may make interpretation harder rather than easier. Good panel design therefore considers excitation, emission spacing, relative brightness, bleed-through risk, and whether the Golgi channel is expected to provide structural anchoring or only supportive context. When broader panel planning is needed, it is often useful to compare these choices with general how to choose the right fluorescent dye for cell staining principles.
When to combine Golgi fluorescent staining with ER or nuclear markers
Golgi fluorescent staining becomes more informative when paired with co-stains that help resolve intracellular context. Nuclear staining helps confirm the expected perinuclear location of the Golgi, while ER-related channels can help determine whether the observed signal is truly Golgi-dominant or partly reticular background. In experiments where boundary clarity matters, combined staining strategies can be much more informative than relying on a single Golgi channel alone. This is particularly true when the workflow aims to distinguish compact Golgi localization from more diffuse membrane system labeling.
Building a Golgi fluorescent staining panel for live or fixed cells?
We can help align Golgi probe choice, antibody marker selection, and multicolor workflow design before you scale the assay.
Practical Workflow for Golgi Fluorescent Staining in Cells
A reliable Golgi fluorescent staining workflow is built by controlling the factors that most strongly affect localization clarity, background level, and interpretability. Researchers often focus first on reagent identity, but in practice many Golgi staining failures arise because cell condition, incubation design, fixation sequence, or acquisition timing were not matched to the staining method. The steps below are more useful than a one-size-fits-all protocol because they help organize decision points around the intended readout.
- Prepare healthy cells with interpretable Golgi morphology: Cell confluence, attachment quality, growth condition, and treatment timing can all influence whether the Golgi appears compact and well resolved or irregular and difficult to interpret. A poor starting sample can make even a suitable reagent seem ineffective.
- Match the staining method to the probe type: Live-cell dyes and ceramide-type probes require attention to loading conditions, incubation time, temperature, and the interval before imaging. Antibody-based methods require careful control of fixation, permeabilization, blocking, and marker selection. The logic of the method should determine the workflow sequence rather than the other way around.
- Optimize incubation, washing, and imaging timing: Excessive loading can increase diffuse fluorescence or non-ideal membrane background, while insufficient loading can leave the Golgi poorly defined. Wash steps also matter because aggressive handling can reduce useful signal or alter cell morphology, whereas inadequate washing can leave background high. Imaging timing is equally important because a good signal immediately after staining may not remain equally interpretable later.
- Use co-staining controls when interpretation matters: Pairing Golgi staining with nuclear or ER-related channels can help determine whether the fluorescence pattern is structurally convincing. This becomes especially important when the image may otherwise be confused with generalized perinuclear membrane staining. Thoughtful co-staining is often more informative than increasing dye concentration.
- Keep acquisition settings consistent across comparison groups: When the experiment compares Golgi compactness, dispersal, or morphology after treatment, exposure, gain, laser power, and image processing conditions should remain fixed across groups. Variable imaging settings can create false differences that look biological but are actually procedural.
- Document the workflow as part of the interpretation: Concentration range, incubation time, wash sequence, fixation condition, imaging delay, and acquisition settings should all be recorded as part of the staining logic. This improves reproducibility and reduces the risk of overinterpreting a visually attractive but workflow-dependent signal. A structured cell staining protocol framework is especially helpful when the assay may later be transferred or expanded.
Common Problems in Golgi Fluorescent Staining and How to Avoid Them
Golgi fluorescent staining problems are often not limited to obvious failures such as weak signal. More commonly, the image looks plausible while still supporting a weak or ambiguous interpretation. Effective troubleshooting therefore requires researchers to separate visual appearance from analytical reliability. The goal is not only to make the Golgi brighter, but to make the Golgi signal more meaningful for the intended experiment.
- Weak or incomplete Golgi fluorescent signal: Weak signal may arise from low loading efficiency, insufficient incubation, a marker not well matched to the sample type, loss of structural integrity during fixation, or imaging conditions that underrepresent the available fluorescence. Before assuming the biological sample lacks a clear Golgi structure, researchers should test whether the signal logic and handling conditions were appropriate.
- High background or ER-like fluorescence: A common problem in Golgi staining is a perinuclear but poorly resolved fluorescent pattern that extends into diffuse reticular signal. This may reflect non-ideal probe selectivity, overloading, inadequate washing, or optical overlap with surrounding membrane structures. Improving interpretation often depends more on concentration and workflow refinement than on simply pushing for more brightness.
- Signal changes after fixation or permeabilization: A Golgi staining method that looks convincing in live cells may not preserve the same spatial meaning after fixation or downstream processing. Changes in apparent compactness, continuity, or brightness do not automatically represent a biological difference. They may also reflect altered probe retention or structural sensitivity to processing steps.
- Overinterpreting Golgi fragmentation or dispersal: Visual changes in the Golgi region can be analytically important, but they should not be treated as self-explanatory. Apparent dispersal may reflect genuine reorganization, but it may also arise from sample stress, acquisition imbalance, or poor contrast against neighboring membrane systems. Strong conclusions require matched controls and a staining method that supports that level of interpretation.
- Multicolor conflicts that make Golgi interpretation harder: In crowded imaging panels, the Golgi channel can become difficult to interpret if it competes with nearby spectral channels or is overwhelmed by brighter markers. In such cases, troubleshooting may require panel redesign rather than reagent replacement alone. Better spectral planning can improve Golgi clarity more effectively than simply changing concentration.
How We Support Golgi Fluorescent Staining Workflows?
We support Golgi fluorescent staining projects with workflow-oriented probe selection, channel planning support, and practical guidance for live-cell and fixed-cell imaging designs. The goal is not just to supply fluorescent reagents, but to help researchers build a Golgi staining workflow that fits their imaging question, sample state, and interpretation needs. Because Golgi readouts often sit between structural visualization and trafficking-related analysis, selecting the right staining approach usually requires more than matching a color channel. A more useful strategy is to align probe logic, sample handling, and panel design from the start.
Golgi Fluorescent Probe and Marker Selection Support
- Support for comparing live-cell Golgi dyes, ceramide-based probes, antibody markers, and fluorescent protein-based Golgi labeling approaches according to the intended readout.
- Practical evaluation of when a structurally oriented Golgi fluorescent staining workflow is more suitable than a fixation-dependent marker strategy.
- More targeted discussion of whether a workflow should emphasize localization, morphology comparison, trafficking context, or multicolor compatibility.
- Relevant Golgi-oriented product discussion may include ceramide-type probes such as NBD C6-Ceramide when the study design supports membrane-associated Golgi visualization.
Multicolor Panel Design for Golgi-Centered Imaging
- Support for fitting Golgi staining into broader imaging panels that also include nucleus, ER, lysosome, membrane, or mitochondrial channels.
- Guidance on balancing spectral spacing, relative brightness, and channel priority so the Golgi signal remains interpretable rather than crowded out.
- A more structured approach to choosing whether the Golgi channel should operate as a primary structural anchor or as a supporting organelle context layer.
- Better planning for Golgi-related assays performed under fluorescence microscopy conditions that require reproducible side-by-side comparison.
Workflow Optimization for Live-Cell and Fixed-Cell Golgi Staining
- Assistance with aligning staining logic to cell state, incubation timing, wash sequence, fixation strategy, and image acquisition design.
- Help with distinguishing weak probe performance from workflow-related issues such as sample stress, high background, or loss of structural meaning after processing.
- Practical troubleshooting support for workflows affected by diffuse background, ER-like fluorescence, or unstable post-staining appearance.
- More reproducible Golgi staining planning before the assay is scaled, transferred, or integrated into broader organelle analysis projects.
Support for Trafficking and Organelle Interaction Studies
- Useful support for assays where Golgi staining is interpreted alongside vesicular transport, intracellular organization, or organelle interaction analysis.
- More structured comparison of Golgi-centered imaging designs used in morphology studies, multicolor organelle workflows, and trafficking-related experimental setups.
- Better alignment of reagent choice and workflow design with the level of structural confidence needed for comparative analysis.
- Related fluorescence resources may also connect with fluorescent protein services, fluorescent nanoparticle services, fluorescent bead services, high-throughput screening, and molecular imaging.
Do You Need A Consultation?
BOC Sciences integrates cutting-edge fluorescence technologies to accelerate your research, driving next-generation solutions for drug discovery and diagnostics.
Transform Your Studies with Cutting-Edge Fluorescent Products
| Catalog | Name | CAS | Inquiry |
|---|---|---|---|
| A16-0059 | C6 NBD Ceramide | 94885-02-6 | Bulk Inquiry |
| A16-0029 | Resazurin sodium salt | 62758-13-8 | Bulk Inquiry |
| A16-0162 | TEMPO choline | 50669-92-6 | Bulk Inquiry |
| A16-0226 | TE-L-Tyrosine (FET-precursor) | 478037-15-9 | Bulk Inquiry |
| A16-0104 | JC-9 Dye | 522592-13-8 | Bulk Inquiry |
| A16-0219 | Toto-1 | 143413-84-7 | Bulk Inquiry |
| A16-0204 | Oxazole yellow | 152068-09-2 | Bulk Inquiry |
| A16-0206 | C-Laurdan | 959839-06-6 | Bulk Inquiry |
| A16-0194 | LysoTracker Red DND-99 | 231946-72-8 | Bulk Inquiry |
High-Performance Fluorescent Tools for Your Research
- Fluorescent Probes Versatile tools for biomolecular and cellular imaging.
- Endoplasmic Reticulum Fluorescent Probes ER-targeted dyes for organelle structure analysis.
- Golgi Fluorescent Probes Targeted probes for Golgi apparatus visualization.
- Nitric Oxide (NO) & Reactive Oxygen Species (ROS) Probes for oxidative stress and signaling detection.
- Cell Proliferation Tracer Fluorescent Probes Long-term tracking of cell division processes.
- Ion Fluorescent Probes Indicators for real-time ion concentration imaging.
- Apoptosis Fluorescent Probes Probes detecting programmed cell death events.
- Lipid Fluorescent Probes Dyes for lipid droplets and membranes.
Explore More Topics
Online Inquiry
