

Flow Cytometry – 8 Common Sample Preparation and Intracellular Staining Protocols
Flow cytometry (FCM), as a precise technology for multi-parameter quantitative analysis of heterogeneous cell populations at the single-cell level, relies heavily on the quality of sample pre-processing for accurate and reliable data. Preparing highly viable, non-aggregated single-cell suspensions with stable antigen expression is the cornerstone for subsequent fluorescence compensation, population gating, and signal analysis. Maintaining cell viability, removing dead cell debris, and excluding doublets directly affect the signal-to-noise ratio (S/N ratio) and the effectiveness of gating strategies. Physical dissociation tailored to tissue mechanics, such as spleen, bone marrow, or thymus, or density gradient centrifugation and red blood cell lysis for peripheral blood, must strictly follow standardized operating procedures (SOPs) to prevent excessive cell damage or enzymatic/epitope loss. For intracellular targets like cytokines and transcription factors, precise fixation and permeabilization are crucial for crossing biological membranes, ensuring antibody access, and maintaining specific binding. This article systematically outlines eight typical single-cell preparation and intracellular staining protocols, providing standardized references for establishing high-quality flow cytometry workflows.
Mouse Tissue Single-Cell Suspension Preparation
Spleen Single-Cell Suspension Preparation
- Remove the mouse spleen and immerse it in 1× PBS buffer.
- Using tweezers, gently mash the spleen tissue over a 200-mesh filter (70 μm cell strainer), or use the flat end of a syringe plunger to grind, until no visible red clumps remain.
- Collect the homogenate into a 15 mL centrifuge tube, then wash the filter with 1× PBS and combine the wash with the collected homogenate. Centrifuge at 875×g, 4°C for 5 min. Note: Different centrifuge models have varying effective radii; centrifugal force and speed can be converted using the formula: G = 1.11 × 10⁻⁵ × R × (rpm)².
- Discard the supernatant and resuspend cells in 4 mL 1× RBC lysis buffer. Lyse at room temperature for 5 min, then immediately add 10 mL 1× PBS to stop lysis. Centrifuge at 875×g, 4°C for 5 min.
- Discard the supernatant, resuspend in 5 mL 1× flow cytometry staining buffer, and centrifuge at 875×g, 4°C for 5 min.
- Discard the supernatant, resuspend in 1× staining buffer, filter through a 200-mesh strainer, and count cells. Adjust cell concentration to 1×10⁷ cells/mL.
- Aliquot 100 μL of the cell suspension into a 2 mL tube for flow cytometry staining.
Tips:
- Using the mouse's left and right sides as reference, the spleen is located in the upper left abdominal cavity, elongated, soft, and fragile. Handle carefully to avoid breaking and remove surrounding fat thoroughly.
- Grind thoroughly to maximize cell yield.
- Spleen tissue is highly vascular; ensure complete RBC lysis.
- Keep cells on ice (0–4°C) during all steps to maintain viability.
Bone Marrow Single-Cell Suspension Preparation
- Carefully cut open the mouse abdominal skin with scissors and tweezers, then along the hind limbs cut the leg skin and around the ankle to fully separate the leg skin.
- Carefully remove leg muscles, cut at the joints, and isolate the femur and tibia as intact as possible. Place them in 1× PBS buffer.
- Cut the ends of the femur and tibia to expose the marrow cavity. Using a 10 mL sterile syringe filled with 10 mL 1× PBS, replace with a 1 mL syringe needle, carefully insert into the marrow cavity, and slowly flush out the bone marrow. Repeat 2–3 times until the marrow cavity turns white.
- After flushing, gently disperse cell clumps with a pipette, filter through a 200-mesh strainer, collect filtrate into a 15 mL centrifuge tube, and centrifuge at 875×g, 4°C for 5 min.
- Discard supernatant, resuspend in 2 mL 1× RBC lysis buffer, lyse at room temperature for 5 min, then immediately add 10 mL 1× PBS to stop lysis. Centrifuge at 875×g, 4°C for 5 min.
- Discard supernatant, resuspend in 5 mL 1× staining buffer, centrifuge at 875×g, 4°C for 5 min.
- Discard supernatant, resuspend in 1× staining buffer, filter through a 200-mesh strainer, count cells, and adjust concentration to 1×10⁷ cells/mL.
- Aliquot 100 μL of the cell suspension into a 2 mL tube for flow cytometry staining.
Tips:
- Fully isolate femur and tibia to avoid breaking bones and wasting marrow.
- Flush marrow completely until the cavity appears white and semi-transparent.
- Bone marrow samples have distinct cell populations and fewer RBCs than spleen; 1–2 mL RBC lysis buffer per mouse is sufficient, and lysis should not exceed 5 min.
- Keep cells on ice (0–4°C) throughout the procedure to maintain viability.
Thymus Single-Cell Suspension Preparation
- Using scissors and tweezers, cut a small opening at the sternum, then tear the skin to expose the sternum.
- Cut the anterior sternum and lateral ribs in front of the heart, and carefully remove the thymus from the anterior mediastinum above the heart. Immerse in 1× PBS buffer.
- Place the thymus on a 200-mesh strainer and grind thoroughly with tweezers until no visible clumps remain.
- Collect the homogenate into a 15 mL centrifuge tube, wash the strainer with 1× PBS, and combine the wash. Centrifuge at 875×g, 4°C for 5 min.
- Discard supernatant, resuspend in 1× staining buffer, filter through a 200-mesh strainer, and count cells. Adjust cell concentration to 1×10⁷ cells/mL.
- Aliquot 100 μL of the cell suspension into a 2 mL tube for flow cytometry staining.
Tips:
- Avoid cutting surrounding blood vessels when removing the thymus. If vessels are accidentally cut, wash the thymus multiple times with 1× PBS to remove RBC interference.
- Keep cells on ice (0–4°C) during all steps to maintain viability.
Mouse Platelet Isolation
- Hold the mouse with the left hand to protrude the eyeball, then quickly enucleate using tweezers, allowing peripheral blood (~500–600 μL) to flow into an EDTA-K2 anticoagulant tube. Gently invert the tube to ensure complete mixing of blood with anticoagulant.
- Centrifuge at 150×g, room temperature, for 15 min; the sample separates into three layers: bottom RBC layer, middle buffy coat (WBCs and platelets), and top platelet-rich plasma. Carefully transfer the middle and top layers into a 1.5 mL centrifuge tube.
- Centrifuge at 200×g, room temperature, for 10 min to further remove RBCs and WBCs; transfer the supernatant (platelet-rich plasma) to a 2 mL tube and centrifuge at 861×g, room temperature, for 12 min to pellet platelets.
- Resuspend platelets in 1× flow cytometry staining buffer and keep on standby.
- Use 100 μL of the platelet suspension per 2 mL tube for flow cytometry staining.
Tips:
- Avoid contact with fur during eyeball blood collection to prevent hemolysis, which may affect experimental results.
- After collection, invert the anticoagulant tube to fully mix blood with the anticoagulant and prevent clotting.
- When aspirating the buffy coat and platelet-rich plasma, avoid drawing up the bottom RBC layer to maintain platelet purity.
- Experiments should be conducted at room temperature (21–24°C); temperatures outside this range may activate platelets. For downstream processing, PGE1 and ATP-diphosphatase can be added to PBS to prevent platelet activation.
Mouse Peritoneal Macrophage Extraction
- Three days after intraperitoneal injection of starch broth, immerse the mouse in 75% ethanol for 5 min.
- Place the mouse in a biosafety cabinet and carefully cut open the abdominal skin using scissors and tweezers.
- Using a 10 mL sterile syringe, withdraw 5 mL 1× PBS containing 0.3% heat-inactivated serum, then replace with a 1 mL sterile syringe needle, carefully insert into the peritoneal cavity, slowly inject, and gently massage the abdomen to distribute the fluid. After 3–5 min, aspirate the fluid into a 15 mL centrifuge tube. Repeat once.
- Centrifuge at 875×g, 4°C for 5 min; discard supernatant and resuspend cells in 10 mL complete DMEM (Basic DMEM + 10% heat-inactivated FBS + 1% dual antibiotics). Transfer to a 10 cm culture dish and incubate at 37°C, 5% CO₂ for 5 hours for cell adhesion.
- Remove culture medium and non-adherent cells; wash residual medium with 1× PBS. Add 3 mL trypsin and digest at 37°C for 1 min. Add complete DMEM to stop digestion and gently pipette to detach adherent cells.
- Collect the cell suspension into a 15 mL centrifuge tube, centrifuge at 875×g, 4°C for 5 min.
- Discard supernatant, resuspend in 5 mL 1× flow cytometry staining buffer, centrifuge at 875×g, 4°C for 5 min.
- Discard supernatant, resuspend in 1× staining buffer, count cells, and adjust concentration to 1×10⁷ cells/mL. Use 100 μL per 2 mL tube for flow cytometry staining.
Tips:
- Avoid cutting through the peritoneum when opening the abdominal skin.
- When injecting PBS into the peritoneal cavity, avoid puncturing nearby organs.
- If peripheral blood accidentally enters the cavity, wash the culture dish several times with 1× PBS after 5 hours of adhesion to remove RBC interference.
Human Peripheral Blood Mononuclear Cell (PBMC) Preparation
Density Gradient Centrifugation
- Collect whole blood in heparin or EDTA anticoagulant tubes; dilute 1:1 with 1× PBS. In a 15 mL centrifuge tube, add 5 mL lymphocyte separation medium (density gradient medium, e.g., Ficoll), then carefully and slowly layer the diluted blood on top.
- Centrifuge at 875×g, room temperature, for 20 min with the lowest acceleration and deceleration settings.
- Carefully collect the PBMC layer, add 10 mL 1× PBS, and centrifuge at 875×g, 4°C for 5 min.
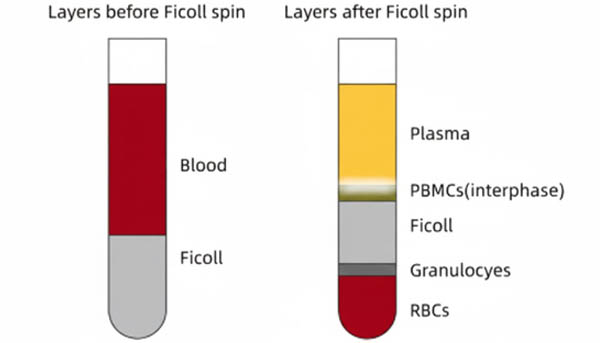 Fig. 1. Schematic of human peripheral blood after centrifugation (BOC Sciences Authorized).
- Discard supernatant, resuspend in 5 mL 1× PBS, and centrifuge at 875×g, 4°C for 5 min to further remove residual platelets, plasma proteins, and separation medium.
- Discard supernatant, resuspend in 1× staining buffer, count, and adjust concentration to 1×10⁷ cells/mL.
- Use 100 μL per 2 mL tube for flow cytometry staining.
Tips:
- The ratio of diluted blood to lymphocyte separation medium should be 1:1; for example, 10 mL diluted blood requires 10 mL separation medium, which should be equilibrated to room temperature before use.
- Use a Pasteur pipette to slowly layer diluted blood along the tube wall to maintain a flat interface and a clear separation layer. This step is critical.
- During density gradient centrifugation, acceleration and deceleration must be set to the lowest to prevent mixing of cell layers.
- When collecting PBMCs, move the pipette tip slowly along the top of the PBMC layer from top to bottom, avoiding upper plasma, lower separation medium, RBCs, and granulocytes. Multiple small-volume aspirations improve PBMC purity.
- Process blood samples within 2 hours of collection for optimal results.
Red Blood Cell (RBC) Lysis Method
Unlike other sample types, peripheral blood requires flow cytometry staining prior to further processing:
- Dilute anticoagulated blood with physiological saline (0.9% NaCl); add 100 μL of diluted blood to a 2 mL centrifuge tube.
- Add Fc block antibody and incubate at room temperature for 10 min.
- Add flow cytometry antibodies and incubate at room temperature, protected from light, for 35 min.
- Add 2 mL 1× RBC lysis buffer per tube, resuspend, and incubate at 37°C for 12 min; centrifuge at 382×g, 4°C for 5 min.
- Add 2 mL 1× flow cytometry staining buffer, resuspend, centrifuge at 382×g, 4°C for 5 min.
- Resuspend each tube in 200 μL 1× staining buffer and proceed to flow cytometry analysis.
Tips:
- RBC lysis must be performed at 37°C for complete lysis.
- If detecting RBC surface markers, RBC lysis is not required; dilute peripheral blood approximately 20-fold before antibody incubation.
Comparison of Two Methods
| Method | Advantages | Disadvantages | Application |
|---|---|---|---|
| Density Gradient Centrifugation | Efficient removal of contaminating cells without affecting target cell function | Time-consuming and requires precise, professional handling | Commonly used for sorting and functional assays |
| RBC Lysis | Simple and quick; effectively removes RBCs without damaging target cells | Residual RBC debris may remain, difficult to remove | Used for leukocyte or neutrophil analysis |
Cell Line Sample Preparation
Compared with tissue single-cell suspensions, preparing cell line samples is simpler and can follow the standard experimental workflow below:
Suspension Cell Line Preparation
- In a biosafety cabinet, gently pipette to fully disperse cells; collect cell suspension into a 15 mL centrifuge tube and centrifuge at 315×g, 4°C for 5 min.
- Discard supernatant, resuspend in 5 mL 1× staining buffer, centrifuge 315×g, 4°C for 5 min.
- Discard supernatant, resuspend in 1× staining buffer, count, and adjust concentration to 1×10^7 cells/mL.
- Use 100 μL per 2 mL centrifuge tube for flow cytometry staining.
Adherent Cell Line Preparation
- In a biosafety cabinet, discard culture medium and wash cells once with sterile 1× PBS.
- Add appropriate amount of trypsin to digest adherent cells; digestion time varies by cell type, generally 2 min at 37°C. (If unsure, observe under microscope: cells turning from spindle-shaped to round indicates digestion is complete.)
- Add complete medium to stop digestion; gently pipette to detach remaining cells and ensure full dispersion.
- Collect cell suspension into a 15 mL tube, centrifuge 315×g, 4°C for 5 min.
- Discard supernatant, resuspend in 5 mL 1× staining buffer, centrifuge 315×g, 4°C for 5 min.
- Discard supernatant, resuspend in 1× staining buffer, count, adjust to 1×10^7 cells/mL, and stain 100 μL per 2 mL tube.
Intracellular Flow Cytometry Staining
After preparing the eight common single-cell suspensions above, surface protein staining can be performed. For intracellular targets such as cytokines and transcription factors, fixation and permeabilization are required. Fixatives preserve cell morphology, while permeabilization reagents create small pores in the membrane, allowing antibodies to access intracellular antigens. The following illustrates human interleukin-2 (IL-2) as an example:
Experimental Workflow
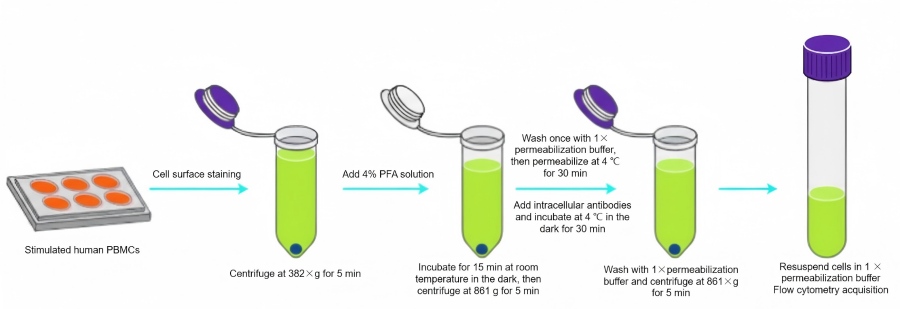 Fig. 2. Workflow for intracellular flow cytometry staining of IL-2–expressing PBMCs cells (BOC Sciences Authorized).
Procedure
- Stimulate human PBMCs to induce IL-2 production; adjust cell concentration to 1×10^7 cells/mL and aliquot 100 μL per 2 mL tube. Add viability dye and incubate at 4°C in the dark for 30 min.
- Add 2 mL 1× staining buffer, centrifuge at 382×g, 4°C for 5 min.
- Discard supernatant; resuspend in 100 μL 1× staining buffer, add Fc block antibody, and incubate at room temperature for 10 min.
- Add appropriate fluorescently labeled surface antibodies to the Fc-blocked cells, mix, and incubate at 4°C in the dark for 35 min.
- Wash with 2 mL 1× staining buffer, centrifuge at 382×g, 4°C for 5 min.
- Discard supernatant; fix each tube with 100 μL 4% PFA at room temperature, protected from light, for 15 min.
- Centrifuge at 861×g, 4°C for 5 min, discard supernatant; resuspend in 1 mL 1× permeabilization buffer to wash away residual fixative.
- Centrifuge 861×g, 4°C for 5 min, discard supernatant; resuspend in 100 μL 1× permeabilization buffer and incubate at 4°C in the dark for 30 min.
- Add fluorescently labeled intracellular antibodies and incubate 35 min at 4°C in the dark.
- Wash with 2 mL 1× permeabilization buffer, centrifuge 861×g, 4°C for 5 min.
- Discard supernatant; resuspend in 200 μL 1× permeabilization buffer and proceed to flow cytometry analysis.
Experimental Results:
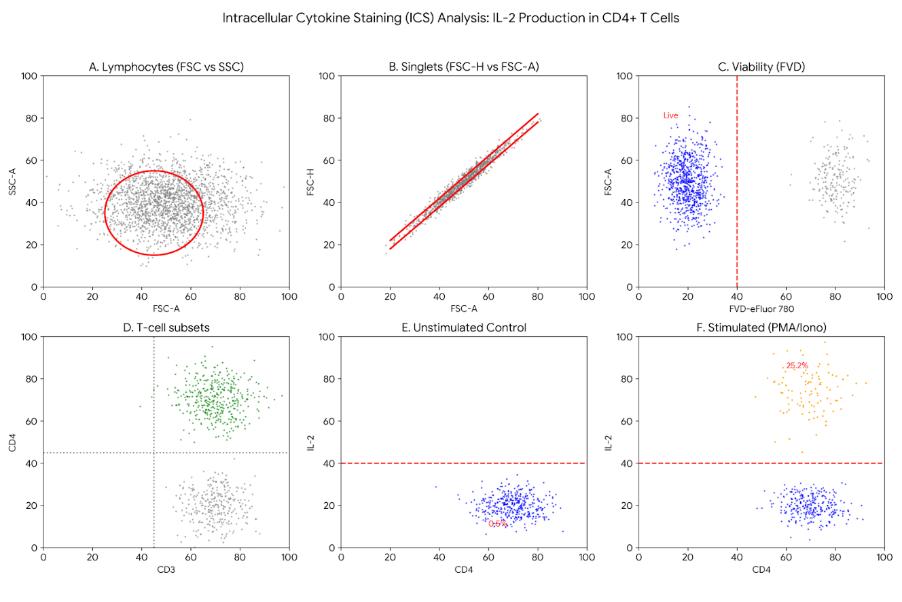 Fig 3. Gating strategy and IL-2 expression in CD4+ T cells post-stimulation (BOC Sciences Authorized).
Tips:
- IL-2 is a secreted protein, primarily localized in the cytoplasm and extracellular space.
- For nuclear antigens such as Foxp3/transcription factors, specific fixatives and permeabilization reagents are required.
Fluorescent Dyes Recommended for Your Research Project
| Catalog | Name | CAS | Inquiry |
|---|---|---|---|
| R10-0005 | 6-Fluorescein phosphoramidite | 204697-37-0 | Bulk Inquiry |
| F04-0012 | FITC isomer I | 3326-32-7 | Bulk Inquiry |
| A16-0201 | DAPI dihydrochloride | 28718-90-3 | Bulk Inquiry |
| A16-0033 | 6-Carboxyfluorescein | 3301-79-9 | Bulk Inquiry |
| F02-0030 | Cy3-NHS ester | 146368-16-3 | Bulk Inquiry |
| A19-0034 | DAPI dilactate | 28718-91-4 | Bulk Inquiry |
| A17-0061 | Rhodamine 610 Perchlorate | 23857-51-4 | Bulk Inquiry |
| R15-0017 | TCO-PEG4-biotin | 2183440-30-2 | Bulk Inquiry |
| F07-0016 | Dde TAMRA Biotin Alkyne | 2353409-55-7 | Bulk Inquiry |
| A17-0178 | Cy5.5 bis-NHS ester | 2183440-77-7 | Bulk Inquiry |
| A19-0101 | Biotin-Aniline | 769933-15-5 | Bulk Inquiry |
| A19-0104 | TO1-Biotin | 1622455-90-6 | Bulk Inquiry |
| R12-0004 | Texas Red-X | 199745-67-0 | Bulk Inquiry |
| R01-0042 | AF594 activated ester, 5-isomer | 1638544-48-5 | Bulk Inquiry |
| R01-0471 | AF647 NHS ester | 407627-60-5 | Bulk Inquiry |
| R01-0451 | AF 488 TFP ester | 2133404-55-2 | Bulk Inquiry |
| A17-0130 | N-methyl-N'-(azide-PEG3)-Cy3 | 2107273-16-3 | Bulk Inquiry |
| F03-0023 | Sulfo-Cy3-Methyltetrazine | 1801924-47-9 | Bulk Inquiry |
Corporate Profile
BOC Sciences is a specialized technology-driven company serving global academic and biopharmaceutical customers with fluorescent products and fluorescence labeling services, with sustained development and technical support focused on flow cytometry–related applications. Built on established platforms in organic synthesis, functional dye design, and bioconjugation technologies, the company has developed a systematic product portfolio covering small-molecule fluorescent dyes, conjugatable fluorophores, fluorescently labeled antibodies, tandem dyes, and probes for multicolor flow cytometric analysis, enabling multiparametric single-cell detection and quantitative analysis.
To address the core requirements of flow cytometry—including signal resolution, spectral discrimination, and experimental consistency—BOC Sciences designs its fluorescent products for cell surface antigen detection, intracellular and nuclear factor staining, multicolor flow cytometry, and live-cell analysis. The dye portfolio spans visible, far-red, and near-infrared spectral regions, with emphasis on brightness, photostability, and spectral compatibility, supporting mainstream flow cytometry platforms and complex multiparameter experimental designs.
In addition to standard products, BOC Sciences provides fluorescence labeling and custom services, including covalent conjugation of antibodies and proteins, fluorophore selection and spectral matching, linker and labeling ratio optimization, and experimental condition guidance. All labeling strategies are developed based on specific application requirements and evaluated through internal quality assessment workflows, with a focus on batch-to-batch consistency and experimental reproducibility to meet the demands of research and method development.
The company's R&D and technical support teams consist of professionals with expertise in chemical synthesis, bioconjugation, and flow cytometric analysis, supported by comprehensive capabilities in synthesis, purification, spectral analysis, and structural characterization. A structured quality management system covering raw material control, process monitoring, and final product evaluation is in place to ensure reliable performance. Fluorescent dyes, probes, and labeling services from BOC Sciences have been adopted by universities, research institutes, and biopharmaceutical companies worldwide for flow cytometry, cell imaging, and assay development, with application validation reported across multiple scientific studies and academic publications.
Custom Fluorescent Solutions Designed for Your Experiments
- DNA StainingPrecise fluorescent dyes for clear DNA visualization and analysis.
- Lipid StainingFluorescent solutions for effective lipid structure imaging.
- Cell StainingAdvanced staining for detailed cell morphology and analysis.
- Protein StainingHigh-quality staining for accurate protein detection and imaging.
- Bacteria ImagingFluorescent solutions to visualize bacterial structures and activity.
- Cell ImagingVisualize and analyze live or fixed cells using advanced fluorescence.
- Molecular ImagingCutting-edge fluorescent solutions for deep molecular analysis.
- Fluorescence ImagingHigh-resolution imaging solutions for detailed fluorescence studies.
- BioconjugationCustom bioconjugation services for protein, peptide, and dye linking.
- Drug DeliveryTailored fluorescent solutions for efficient drug delivery research.
- Molecular DiagnosticsFluorescent probes and markers for precise molecular diagnostics.
- Flow CytometryFluorescent dyes and reagents for enhanced flow cytometry analysis.
High-Performance Fluorescent Tools for Your Research
- Nuclear Fluorescent Probes DNA-binding dyes for nucleus visualization.
- pH Indicators Fluorescent sensors for intracellular pH monitoring.
- Mitochondrial Fluorescent Probes Targeted dyes for mitochondrial structure and function.
- Apoptosis Fluorescent Probes Probes detecting programmed cell death events.
- Cell Proliferation Tracer Fluorescent Probes Long-term tracking of cell division processes.
- Ion Fluorescent Probes Indicators for real-time ion concentration imaging.
- Calcium, Chloride and Other indicators Fluorescent indicators for intracellular ion flux monitoring.
- Other Cell Fluorescent Probes Functional probes for diverse cellular imaging studies.
Explore More Topics
Online Inquiry
