

Cell Staining Protocol: Step-by-Step Guide for Reliable Results
A reliable cell staining workflow begins long before a dye is added to a dish, slide, or tube. The quality of the final signal depends on whether the sample state, staining goal, detection platform, dye chemistry, incubation conditions, washing logic, and image acquisition settings were aligned from the start. When these elements are planned well, cell staining can reveal cellular structure, organelle localization, membrane behavior, viability state, or population-level differences with strong interpretability. When they are mismatched, even bright fluorescence can produce misleading images, unstable signal, or poor reproducibility. This page is designed as a practical protocol guide rather than a narrow recipe for one stain. Different experiments require different dyes, buffers, fixation strategies, and acquisition approaches, so a useful protocol page should explain the logic of each step and show how researchers can adjust the workflow without losing analytical quality. That is especially important in fluorescence-based assays, where signal strength alone is never enough. A technically successful result must also preserve biological meaning, minimize background, and remain compatible with the readout platform.
What Is Cell Staining and Why Does It Matter?
Cell staining is the process of using dyes, probes, or labeled reagents to visualize, distinguish, or analyze cells based on structural, biochemical, or functional features. In fluorescence-based workflows, cell staining helps researchers observe what would otherwise be difficult to detect clearly, such as nuclei, membranes, organelles, intracellular compartments, viability states, or dynamic changes in cell behavior. The practical value of staining lies in converting biological differences into signals that can be measured through microscopy, imaging platforms, or population-based detection systems.
Basic Definition of Cell Staining
At its core, cell staining means introducing a reagent that interacts selectively or preferentially with a cellular feature of interest. That feature may be a structure such as the nucleus, a physicochemical environment such as pH or membrane potential, or a biological state such as viability or cell damage. Some stains label cells directly by accumulating in a particular compartment, while others function as fluorescent indicators or target-associated probes. In practice, the definition is broader than "adding color." A meaningful stain is one that produces a detectable and interpretable signal in relation to a clearly defined biological question.
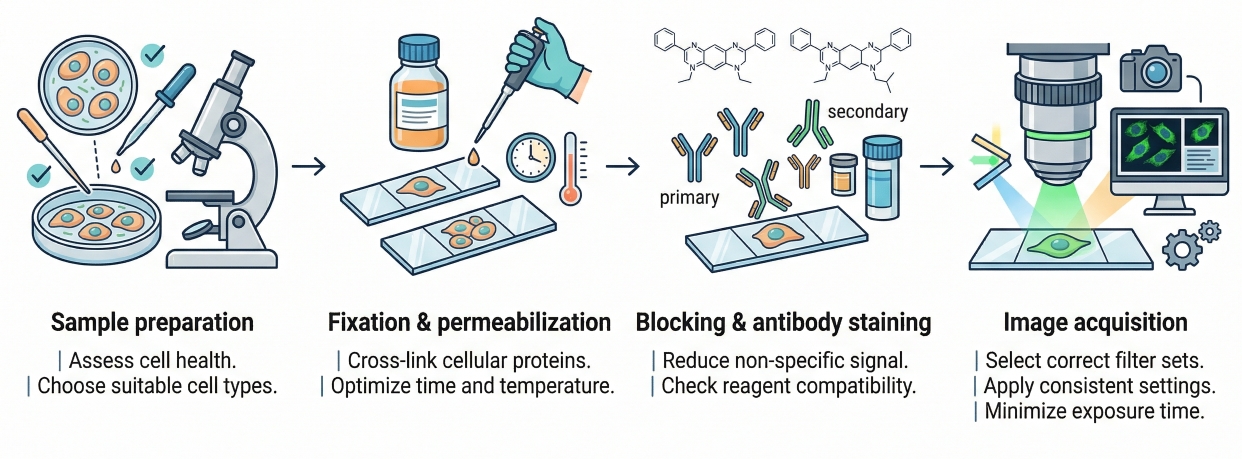 Fig. 1. A reliable cell staining protocol depends on sample quality, reagent compatibility, controlled staining steps, and consistent acquisition (BOC Sciences Authorized).
What Cell Staining Helps Researchers Observe?
The specific value of cell staining depends on the experiment. In some workflows, staining is used to visualize general morphology and define cell boundaries. In others, the main goal is to distinguish intact and damaged cells, follow organelle localization, compare treated and untreated populations, or support multiparameter analysis in fluorescence microscopy. A staining workflow may therefore support qualitative observation, quantitative analysis, or both. The same sample can also be stained for different reasons at different stages of a project, such as initial screening, mechanistic follow-up, or panel optimization.
Why Staining Quality Affects Data Interpretation and Reproducibility?
A cell stain is useful only when its signal can be interpreted reliably. Poorly designed staining workflows often create artifacts that look convincing at first glance but fail under repetition or deeper analysis. High background, non-specific accumulation, excessive dye concentration, sample stress, photobleaching, and channel overlap can all make data appear richer than they really are. This is why protocol design matters as much as dye choice. Reproducible cell staining depends on workflow consistency, proper controls, and a match between staining chemistry and the readout platform. If the broader strategy still needs to be defined, researchers often benefit from linking this protocol logic back to a general fluorescent dyes overview or a broader cell staining resource architecture before finalizing the assay.
Looking to refine your cell staining protocol for more consistent results?
We can help you optimize each step—from sample preparation to incubation and washing—to improve signal quality and reproducibility.
Before You Start: Define Sample Type, Staining Goal, and Detection Method
A strong protocol begins with the right experimental questions. Before choosing a dye or preparing a buffer, the researcher should decide what kind of sample is being used, what biological feature needs to be visualized, and how the signal will be read. These decisions determine whether the workflow should prioritize speed, structural preservation, low perturbation, intracellular access, or multicolor compatibility. Many staining failures are not caused by a poor reagent but by a mismatch between the sample and the detection strategy selected at the start.
Live Cells vs Fixed Cells
One of the first decisions is whether the sample must remain biologically active during staining or whether it can be chemically preserved before or after labeling. Live-cell workflows are useful for dynamic observation, viability-sensitive measurements, and short-term tracking, but they require reagents that do not severely disturb cell physiology. Fixed-cell workflows allow more controlled processing, stronger washing, and access to intracellular targets after permeabilization, but they no longer represent a living system during acquisition. That is why staining design should be aligned early with the logic discussed in live cell staining vs fixed cell staining.
Structural Staining vs Functional Staining
Structural staining is usually designed to reveal location, shape, or organization. Examples include nuclear, membrane, or cytoskeletal labeling. Functional staining, by contrast, is often used to report on a property such as membrane integrity, organelle status, ion behavior, or metabolic responsiveness. Structural and functional workflows can overlap, but they should not be treated as interchangeable. A dye optimized for compartment visualization is not automatically the best probe for physiological readout. Clarifying this distinction early helps prevent protocol drift later in the experiment.
Microscopy vs Flow Cytometry vs Endpoint Analysis
The intended detection platform strongly influences protocol design. Image-based workflows often require clean spatial contrast, good morphology preservation, and acquisition settings suitable for a limited number of fields. Population-based workflows such as flow cytometry emphasize rapid and consistent discrimination across many cells, with less reliance on spatial information. Endpoint analysis often favors fixed workflows with controlled processing and stable signal, especially when the experiment includes multiple staining steps or delayed acquisition. Each platform changes what "good staining" means in practice.
Table 1. Key differences between microscopy, flow cytometry, and endpoint analysis in cell staining workflow design.
| Workflow Dimension | Microscopy | Flow Cytometry | Endpoint Analysis |
|---|---|---|---|
| Main Readout | Spatial localization, morphology, and intracellular fluorescence distribution. | Population-level fluorescence intensity and subpopulation discrimination. | Stabilized final-state signal after staining and possible downstream processing. |
| Sample Priority | Preserving cell structure and image clarity within selected fields. | Maintaining single-cell suspension quality and consistent event analysis. | Preserving endpoint structure or signal integrity for later readout. |
| Best-Suited Staining Logic | High-contrast structural stains, organelle probes, and visually interpretable live or fixed stains. | Bright, cleanly separated dyes suitable for rapid population analysis and gating. | Stable stains compatible with fixation, washing, and delayed acquisition. |
| Signal Requirement | Good localization fidelity and manageable background across imaging channels. | Strong signal separation with minimal ambiguity between positive and negative populations. | Signal retention and reproducibility across repeated or delayed measurements. |
| Common Workflow Challenge | Photobleaching, uneven field selection, morphology disturbance, and spatial background interference. | Dead-cell interference, poor gating separation, spectral overlap, and inconsistent suspension handling. | Signal loss after processing, fixation mismatch, or altered localization after endpoint preparation. |
| Typical Strategy Preference | Live-cell or fixed-cell imaging depending on whether the goal is dynamic observation or structural analysis. | Rapid live/dead discrimination, population profiling, or multiparameter fluorescent analysis. | Fixed and stabilized workflows designed for comparison, documentation, or downstream assay consistency. |
Why the Target and Readout Must Be Matched Before Choosing Reagents?
Reagent selection should come after the target and readout are defined. Researchers sometimes start with a fluorophore they already know, then attempt to adapt the sample and workflow around it. This usually creates avoidable problems such as poor retention, unnecessary overlap, or incompatible processing steps. A more reliable approach is to define the biological target, then the sample state, then the detection platform, and only then choose the dye or probe family. That sequence helps the protocol remain biologically meaningful and technically coherent from start to finish.
Step 1: Prepare Cells and Optimize Sample Condition
Good staining starts with good cells. No dye can rescue a sample that has already been damaged by overgrowth, poor culture condition, excessive centrifugation, harsh pipetting, temperature stress, or prolonged delay before staining. Cell preparation is therefore not a preliminary inconvenience; it is one of the central determinants of staining quality. If the cells are unhealthy, overly dense, fragmented, or poorly attached, fluorescence readouts will often reflect preparation artifacts rather than the intended biological feature.
- Cell Density, Confluency, and Culture Condition: Cell density and confluency affect staining performance in several ways. Overcrowded cultures can alter membrane accessibility, create uneven reagent exposure, and make single-cell interpretation difficult during imaging. Very sparse cultures may lead to poor representation, unstable attachment, or uneven signal due to local environmental differences. Healthy growth condition, appropriate medium history, and a consistent treatment timeline are therefore important before staining begins. In many experiments, the most reproducible fluorescence data come from using cells within a defined confluency window rather than from simply staining whatever culture happens to be available.
- Suspension Cells vs Adherent Cells: The physical state of the sample also changes the protocol logic. Adherent cells often require attention to attachment quality, wash strength, and how media changes might disturb morphology. Suspension cells require careful mixing, centrifugation, and resuspension steps that minimize loss and mechanical stress. A protocol that works smoothly in one sample format may fail in the other if handling is transferred without adjustment. That is why sample type should influence incubation volume, wash method, staining vessel, and acquisition preparation from the outset.
- Handling Steps That Can Damage Cell Integrity Before Staining: Several routine actions can reduce staining reliability before the stain is added. Examples include over-centrifugation, repeated aspiration, abrupt temperature changes, prolonged exposure to non-physiological buffers, and excessive light. These handling effects may not be obvious under brightfield observation, but they can strongly influence membrane permeability, dye uptake, viability, and background fluorescence. If a staining result appears inconsistent, sample handling history should be examined as closely as the dye itself.
- Why Poor Sample Condition Cannot Be Fixed by Better Dyes Later: Researchers sometimes respond to weak or unstable staining by increasing dye concentration or extending incubation. If the real problem is damaged sample condition, this usually makes the interpretation worse rather than better. More dye does not restore biological integrity. Instead, it often amplifies background, exaggerates non-specific uptake, or makes dead and stressed cells appear highly fluorescent in misleading ways. A practical protocol should therefore treat sample quality as the first quality-control checkpoint rather than as a variable to be compensated for at later stages.
Step 2: Select Reagents, Buffers, and Controls Before Staining
Once the sample and readout are defined, the next task is to select the chemical components of the workflow. This includes the stain itself, the buffer system, any required media adjustments, and the controls needed to interpret the final signal. At this stage, convenience should never outweigh compatibility. A familiar reagent may not be appropriate for the sample condition, just as a bright dye may not be a good fit for the planned channels or downstream steps.
- Choosing the Right Fluorescent Dye or Probe: Dye selection should reflect the target, the platform, the sample state, and the workflow length. A structural stain may prioritize sharp localization, while a functional probe may prioritize live compatibility and minimal perturbation. Spectral position, brightness, retention, photostability, and compatibility with fixation all influence whether a dye is practical in the intended assay. Researchers often benefit from comparing multiple fluorophore families before committing, especially when the panel may also involve Fluorescein FAM, Rhodamine, Cyanine, BODIPY, or Alexa Fluor signals in related experiments.
- Buffer Compatibility and Reagent Handling Considerations: Buffers influence staining performance more than many protocols acknowledge. pH, ionic strength, serum content, residual additives, and buffer composition can alter dye behavior, cell condition, or background fluorescence. Some stains tolerate standard physiological buffers well, while others require reduced serum, shorter exposure, or protection from specific contaminants. Reagent handling is equally important. Repeated freeze-thaw cycles, excessive light exposure, incomplete dissolution, or prolonged storage after preparation can change staining behavior significantly. A reproducible protocol should therefore define not only which dye is used, but how it is prepared and handled.
- Importance of Unstained, Single-Color, and Viability Controls: Controls are essential for interpreting whether signal is specific, useful, and compatible with the rest of the experiment. Unstained controls help define autofluorescence and instrument background. Single-color controls help distinguish true signal from overlap and simplify channel validation. In many workflows, especially when sample handling may stress cells, a viability control is also important to ensure that fluorescence patterns are not being driven mainly by damaged cells. These controls are not decorative additions to the protocol; they are part of the protocol itself.
- Planning for Spectral Overlap Before the Experiment Starts: Spectral planning should happen before staining begins, not after the first image looks crowded. Even a strong single stain can become difficult to interpret when paired with additional probes in an overlapping channel space. This is why researchers designing more complex workflows should consider excitation sources, filter sets, detector layout, and relative signal intensity before finalizing the reagent list. That logic becomes even more important in multicolor cell staining, where poor channel planning can undermine an otherwise well-executed protocol.
Step 3: Perform Staining Incubation and Washing Correctly
The staining step itself is where many researchers focus their attention, but it should be understood as a controlled balance rather than a simple exposure period. Too little exposure can produce weak, unstable, or incomplete labeling. Too much exposure can increase toxicity, raise background, or alter cellular behavior. The goal of incubation and washing is therefore not to maximize fluorescence at any cost, but to produce a signal that is strong enough to interpret while remaining specific, reproducible, and compatible with the biological state of the sample.
- How Incubation Time and Dye Concentration Affect Signal Quality: Incubation time and concentration should be optimized together rather than independently. Increasing one often changes the effect of the other. A short incubation at high concentration may produce strong staining rapidly but can also elevate background or stress live samples. A lower concentration over a longer time may improve selectivity in some systems but can create drift, redistribution, or excess handling time in others. For practical protocol development, it is often wiser to establish a narrow working range than to assume that more dye and more time will always improve contrast.
- Gentle Mixing, Temperature Control, and Light Protection: Fluorescent staining reactions are sensitive to physical conditions. In live-cell workflows, temperature changes can alter uptake kinetics and cell physiology. In fixed workflows, inadequate mixing can lead to uneven reagent exposure across wells or regions of a sample. Strong light exposure can reduce fluorescence signal before acquisition begins, especially in photolabile systems. A reliable protocol should therefore define how the sample is mixed, whether incubation occurs at room temperature or physiological temperature, and how exposure to ambient light is minimized during handling.
- Washing Logic for Reducing Background Without Losing Signal: Washing is often treated as a routine cleanup step, but it is actually a decision point that can determine whether the final image is specific or noisy. Insufficient washing leaves excess reagent, contributing to haze, non-specific fluorescence, or diffuse signal. Overly aggressive washing, on the other hand, can detach cells, reduce weakly retained signal, or alter fragile live samples. Good washing logic is therefore selective. It removes unnecessary background while preserving the biologically meaningful signal. The right wash strength depends on sample type, reagent behavior, and how firmly the signal is expected to remain associated with the target.
- Common Overstaining and Underwashing Mistakes: Overstaining often looks attractive in a first image because the signal appears bright, but it tends to reduce interpretability by obscuring boundaries, increasing background, and exaggerating damaged-cell fluorescence. Underwashing creates a different problem: the sample may appear broadly positive, with poor contrast between stained and unstained regions. Both errors are common in early optimization because researchers understandably prioritize visible signal. A more professional workflow, however, prioritizes interpretable signal. Brightness is only useful when it improves discrimination rather than masking it.
Step 4: Decide Whether to Image Immediately or Proceed to Fixation and Additional Processing
After staining, the protocol often reaches a branch point: should the sample be read immediately, or should it go through fixation and possibly additional processing before acquisition? This decision has major consequences for signal meaning, target accessibility, and workflow flexibility. Not every stain behaves the same way after fixation, and not every experiment benefits from preserving the sample before imaging. A protocol that does not define this branch clearly may produce results that are technically visible but biologically ambiguous.
- When Immediate Live-Cell Readout Is the Better Option: Immediate imaging is usually the better choice when the signal depends on maintaining a living system. Dynamic uptake, viability-sensitive readouts, membrane behavior, organelle motion, or short-term physiological events are often most meaningful before any fixation is introduced. In such workflows, delay can change the biology being measured or reduce the relevance of the signal. Immediate readout also avoids the assumption that a live-cell stain will preserve its localization after processing.
- When Fixation Is Necessary for Structural or Endpoint Analysis: Fixation becomes more valuable when the experiment emphasizes structural preservation, controlled timing, repeated imaging, or access to intracellular targets that may require further processing. By stabilizing the sample, fixation allows researchers to standardize more of the workflow and can make imaging more manageable across multiple conditions. This is particularly useful in endpoint localization studies, comparative morphology, or workflows that later include additional staining layers. If fixation is part of the plan, it should be anticipated during reagent selection rather than introduced as a last-minute convenience.
- Fixation and Permeabilization Effects on Fluorescence Signals: Fixation can preserve some signals, alter others, and eliminate some entirely. Permeabilization adds another layer of complexity by improving intracellular access while potentially extracting weakly associated components or changing background behavior. These steps are not neutral. They actively reshape the sample and can therefore reshape the meaning of the fluorescence readout. Protocols that involve fixation should define whether the stain is intended to survive processing, whether the localization is expected to remain meaningful, and whether post-fix handling could change signal intensity or spatial pattern.
- Why Not Every Live-Cell Stain Is Suitable for Post-Fix Workflows: A common mistake is to assume that a successful live-cell stain can simply be fixed afterward to extend imaging time. Some signals do survive fixation usefully, but many do not. Dyes can redistribute, diffuse, fade, or lose their biological meaning once the live system is chemically preserved. That is why protocols should treat live-only and live-then-fix workflows as distinct designs, not as interchangeable variations. If the experiment may move into a fixed stage, that requirement should influence stain selection from the beginning.
Step 5: Image Acquisition, Quality Checks, Troubleshooting, and Applications of Cell Staining
The final stage of the protocol determines whether the signal produced during staining can actually be trusted. Acquisition settings, field selection, exposure strategy, control comparison, and troubleshooting logic are all part of this stage. Just as importantly, this is where the staining workflow connects to the broader purpose of the experiment. A technically clean stain is useful only if it supports a real analytical application such as imaging, localization analysis, viability assessment, or multicolor discrimination.
- Setting Up Imaging or Detection Conditions Consistently: Consistency in acquisition is essential for comparing samples meaningfully. Exposure time, detector gain, laser power, filter choice, and channel order should be kept stable across comparable groups unless a defined adjustment is part of the protocol. In microscopy, field selection should avoid bias toward only the brightest or most intact regions. In population-based systems, gating or threshold logic should be informed by controls rather than adjusted after seeing the expected outcome. A reliable protocol therefore documents acquisition settings as carefully as staining conditions.
- How to Judge Whether the Staining Result Is Truly Usable: A usable staining result is not just visible. It should show expected localization or discrimination, acceptable background, consistent behavior across replicates, and signal that remains interpretable in the presence of controls. If the image is bright but diffuse, if the population is broadly positive without clear separation, or if the stain behaves differently across similar samples for no biological reason, the result may not be reliable even if it looks dramatic. Quality assessment should therefore consider biological plausibility, technical consistency, and control behavior together.
- Common Protocol Failures Such as Weak Signal, High Background, and Signal Loss: Weak signal can result from low reagent exposure, poor target accessibility, photobleaching, or damaged sample condition. High background may reflect excessive concentration, insufficient washing, non-specific accumulation, or autofluorescence. Signal loss may occur when the acquisition is delayed too long, when live-cell dyes are processed inappropriately, or when fixation changes the localization pattern unexpectedly. These failures rarely have a single cause. That is why it is useful to examine sample quality, reagent choice, incubation, wash logic, and acquisition settings in sequence when troubleshooting. For broader failure analysis, protocol optimization often overlaps naturally with common problems in cell staining.
- A Final Checklist Before Repeating or Scaling the Experiment: Before repeating or expanding the assay, the researcher should confirm several points: Were the cells in good condition before staining? Were controls included and interpreted correctly? Was the signal strong enough without being dominated by background? Did the acquisition settings remain consistent? Did any fixation or post-processing step change the meaning of the signal? A checklist like this prevents unnecessary repetition and helps determine whether the next step should be scale-up, minor optimization, or deeper redesign.
- Applications of Cell Staining in Research Workflows: The value of a strong protocol becomes most obvious when it is applied across real research scenarios. In cell imaging and fluorescence imaging, cell staining supports morphology assessment, compartment visualization, and time-sensitive live-cell observation. In flow cytometry, staining helps distinguish populations, exclude compromised cells, and improve multiparameter interpretation. In organelle-focused studies, researchers often connect the protocol to product families such as mitochondrial fluorescent probes, lysosomal fluorescent probes, cell membrane fluorescent probes, and nuclear fluorescent probes. In viability, tracking, and multiparameter assays, the same protocol logic helps control sample quality while preserving interpretability across channels. The application may change, but the need for a coherent, well-matched staining workflow remains constant.
Need help adapting staining protocols to your cell type or experimental setup?
We can help tailor protocols based on fixation method, probe compatibility, and detection technique to ensure reliable and repeatable outcomes.
Applications of Cell Staining in Research Workflows
Cell staining is used across a wide range of research workflows because it converts structural, biochemical, and functional differences within cells into signals that can be visualized, compared, and interpreted. Its value does not lie only in making cells visible. A well-designed staining workflow helps researchers define cellular identity, observe subcellular organization, assess sample quality, distinguish biological states, and support quantitative analysis across imaging and population-based platforms. The same core staining logic can therefore serve very different research goals depending on the target, the sample type, and the detection method. In practical research settings, cell staining is often one of the first analytical layers applied to a sample because it provides both biological context and technical control. It can reveal whether cells are healthy enough for analysis, whether a treatment changed morphology or intracellular organization, whether a target compartment is intact, and whether a multicolor assay is interpretable. For this reason, cell staining is not limited to one narrow use case. It is a foundational tool that supports exploratory observation, mechanistic investigation, assay development, and downstream fluorescence-based decision-making.
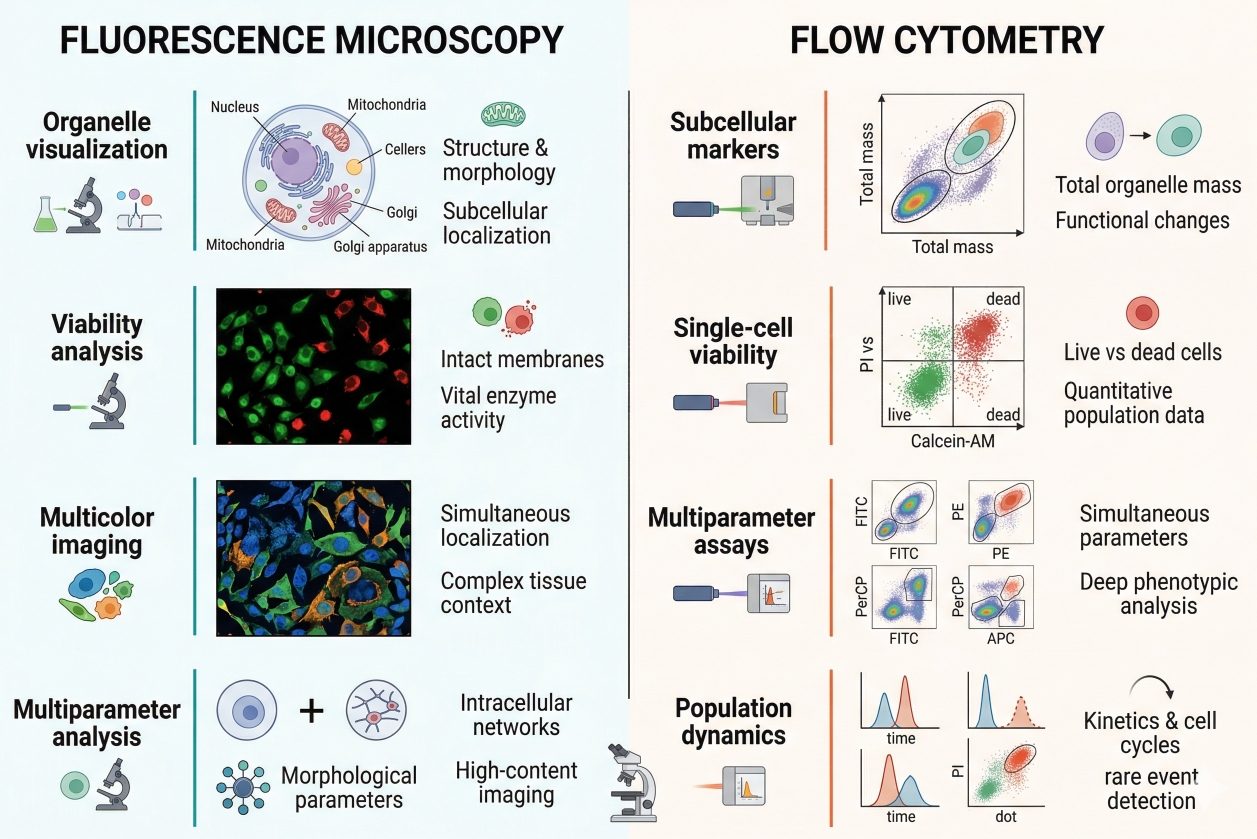 Fig. 2. Applications of cell staining across microscopy, flow cytometry, organelle visualization, viability assessment, and multiparameter fluorescence workflows (BOC Sciences Authorized).
Cell Staining in Fluorescence Microscopy and Cell Imaging
One of the most common applications of cell staining is in fluorescence microscopy and cell imaging, where fluorescent dyes and probes are used to reveal structures or states that are difficult to distinguish under transmitted light alone. Nuclear stains, membrane stains, organelle probes, and viability indicators all help define cellular features with higher contrast and greater interpretive value. In microscopy workflows, staining supports morphology assessment, intracellular localization analysis, time-sensitive live-cell observation, and image-based comparison between conditions. It is especially useful when researchers need spatial context and want to understand not only whether a signal exists, but where it appears within the cell.
Cell Staining in Flow Cytometry and Population-Level Analysis
In flow cytometry and related population-based assays, cell staining is used to distinguish subpopulations, exclude non-viable cells, assess intracellular or surface-associated fluorescence features, and improve the interpretability of multiparameter measurements. Unlike microscopy, this application emphasizes rapid and consistent discrimination across large numbers of cells rather than spatial localization. Cell staining is therefore critical for building robust gating strategies, reducing background from compromised cells, and supporting more reliable comparisons between treated and untreated populations. In this context, the value of staining lies in consistency, clear signal separation, and compatibility with broader fluorescence panel design.
Cell Staining in Organelle Visualization and Localization Studies
A major application of cell staining is the visualization of specific intracellular compartments and organelles. Researchers frequently use fluorescent probes to study the nucleus, mitochondria, lysosomes, plasma membrane, cytoskeleton, Golgi apparatus, endoplasmic reticulum, and lipid-associated compartments. These workflows are central to localization studies because they allow investigators to determine where structures are positioned, whether their distribution changes after treatment, and how different compartments relate spatially within the same cell. This application often connects naturally to product categories such as nuclear fluorescent probes, mitochondrial fluorescent probes, lysosomal fluorescent probes, cell membrane fluorescent probes, cytoskeleton fluorescent probes, and broader cell and organelle stains.
Cell Staining in Viability Assessment and Sample Quality Control
Cell staining is also widely used to determine whether a sample remains suitable for downstream analysis. Viability stains help distinguish intact cells from dead or membrane-compromised cells, which is essential because damaged cells often generate misleading fluorescence, abnormal uptake, or non-specific signal. In this application, staining acts as both a biological measurement and a quality-control tool. It helps researchers decide whether an image, a population profile, or a multicolor panel can be trusted, and it often improves reproducibility by ensuring that only appropriate cells are included in interpretation.
Cell Staining in Cell Tracking and Proliferation Studies
In longitudinal experiments, fluorescent cell stains are often used to follow cell movement, redistribution, or division over time. These workflows are valuable when researchers want to monitor how cells migrate, spread, redistribute within a culture system, or behave after experimental manipulation. Depending on the dye type, staining can support short-term tracking or broader proliferation-related analysis, especially when paired with categories such as cell proliferation tracer fluorescent probes. This application requires careful attention to retention, signal dilution, cell compatibility, and whether the stain is intended for live-cell or endpoint readout.
Cell Staining in Metabolic and Functional State Analysis
Some cell staining workflows are designed not just to show structure, but to report on a biological property such as membrane integrity, metabolic uptake, ion-associated behavior, or intracellular environmental change. These applications may involve fluorescent indicators, uptake probes, or dyes that respond to compartment-specific conditions. In such experiments, staining provides a functional readout that complements structural imaging. The interpretation must remain mechanism-aware, because these stains often report on cellular state rather than a fixed structural target. When designed carefully, this application can add significant depth to fluorescence-based analysis by linking visual signal to biological activity.
Cell Staining in Multicolor and Multiparameter Fluorescence Assays
Modern research workflows often combine multiple stains in a single experiment to create a more informative cellular profile. A nucleus may be counterstained while another dye defines the membrane, a third marks an organelle, and a fourth distinguishes viability or treatment response. In these multiparameter workflows, cell staining becomes part of a panel rather than a single-label task. The application is especially powerful because it allows researchers to examine multiple aspects of cell state simultaneously, but it also requires stronger spectral planning, better controls, and more careful interpretation. This is why multicolor workflows often depend on early coordination between protocol design, dye selection, and imaging strategy.
Cell Staining in Assay Development and Screening Workflows
Beyond basic observation, cell staining is frequently integrated into assay development and screening environments where reproducibility, throughput, and analytical clarity are essential. Researchers may use staining to define assay endpoints, identify responder versus non-responder populations, monitor structural changes under treatment, or confirm sample integrity before larger experimental series. In this setting, the main value of staining lies in robustness and scalability. A staining method that is easy to interpret but difficult to reproduce is often less useful than a slightly simpler method that behaves consistently across many samples or conditions.
Cell Staining as a Bridge Between Observation and Interpretation
Perhaps the most important application of cell staining is that it acts as a bridge between raw cellular material and interpretable fluorescence data. It helps transform visual complexity into analyzable contrast. Whether the experiment focuses on morphology, localization, viability, uptake, organelle distribution, or multicolor discrimination, the staining workflow defines how much biological insight can be extracted from the sample. This is why cell staining remains a foundational technology across fluorescence-based research rather than a narrow technical add-on. Its applications are broad precisely because it supports both basic visualization and more advanced analytical decision-making.
How BOC Sciences Supports Cell Staining Workflow Design?
BOC Sciences supports cell staining workflow design through integrated capabilities in fluorescent product supply, custom dye and probe development, staining strategy optimization, and quality-focused supply support. Rather than treating cell staining as a simple reagent choice, we help researchers align staining targets, fluorophore properties, sample conditions, imaging platforms, and downstream analysis needs with the actual goals of the experiment. This is especially important in cell staining workflows, where dye selectivity, spectral compatibility, photostability, and protocol fit all influence whether the final staining strategy is practical, reproducible, and analytically useful. Our support is therefore structured to cover both routine cell staining needs and more advanced protocol development requirements.
Comprehensive Fluorescent Product Supply for Cell Staining
- Access to a wide range of cell staining fluorescent products, including nuclear dyes, membrane dyes, mitochondrial dyes, lysosomal dyes, and other reagents used for structural and organelle-focused cell analysis.
- Support for selecting fluorophores across multiple spectral regions, including UV, visible, and near-infrared fluorescence, to improve compatibility with different imaging instruments and multichannel workflows.
- Availability of staining options suited to both live-cell and fixed-cell applications, depending on sample handling strategy, imaging goals, and endpoint requirements.
- Product supply based on high-purity, high-stability standardized materials to help improve consistency and reproducibility across repeated staining experiments.
Customized Fluorescent Dye and Probe Development
- Custom design of cell staining probes according to specific research objectives, including probes targeted to defined organelles, cellular structures, or biomolecular targets.
- Structural optimization of fluorescent dyes to improve photostability, quantum yield, biocompatibility, and broader workflow performance in cell-based imaging experiments.
- Support for functional-group modification and multifunctional design strategies, including dual-labeling concepts or responsive probe formats adapted to more specialized applications.
- One-stop custom solutions covering molecular design, synthesis, modification, and validation to support tailored cell staining reagent development from concept to usable material.
Staining Strategy Optimization and Technical Support
- Practical guidance for designing and optimizing cell staining protocols, including concentration range, incubation time, staining sequence, and imaging parameter considerations.
- Assistance with choosing compatible fluorescent dye combinations to reduce spectral overlap and improve overall panel readability in multicolor experiments.
- Support for multiplex staining strategies where several structural or functional targets need to be visualized together within the same assay.
- Troubleshooting help for common staining challenges, including high background, photobleaching, cell-associated toxicity concerns, and reduced localization clarity under real imaging conditions.
Quality Control and Stable Supply Assurance
- Fluorescent cell staining products supported by strict quality testing using analytical methods such as HPLC, LC-MS, and NMR where applicable.
- Availability of complete quality documentation, including COA and related analytical reports, to support research use, internal review, and project documentation needs.
- Flexible supply support suitable for both small-scale experimental use and larger purchasing requirements across different project stages.
- Attention to batch stability and long-term supply continuity to help support ongoing research programs and repeated staining workflows over time.
Do You Need A Consultation?
BOC Sciences integrates cutting-edge fluorescence technologies to accelerate your research, driving next-generation solutions for drug discovery and diagnostics.
Transform Your Studies with Cutting-Edge Fluorescent Products
| Catalog | Name | CAS | Inquiry |
|---|---|---|---|
| A16-0032 | CytoTrace™ Orange CMTMR | 323192-14-9 | Bulk Inquiry |
| A16-0185 | DPH propionic acid | 84294-98-4 | Bulk Inquiry |
| A16-0057 | C10 AV Ceramide | 1263052-40-9 | Bulk Inquiry |
| A16-0056 | ReZolve-L1™ | 1369583-75-4 | Bulk Inquiry |
| A16-0070 | Biocytin hydrazide | 102743-85-1 | Bulk Inquiry |
| A16-0190 | 2-NBDG | 186689-07-6 | Bulk Inquiry |
| A16-0047 | C6 NBD Glucosylceramide | 94885-03-7 | Bulk Inquiry |
| A16-0025 | 5(6)-Carboxyfluorescein diacetate | 124387-19-5 | Bulk Inquiry |
| A16-0026 | Di-8-ANEPPS | 157134-53-7 | Bulk Inquiry |
| A16-0035 | Calcein Blue AM | 168482-84-6 | Bulk Inquiry |
High-Performance Fluorescent Tools for Your Research
- Nuclear Fluorescent Probes DNA-binding dyes for nucleus visualization.
- Cell Proliferation Tracer Fluorescent Probes Long-term tracking of cell division processes.
- Ion Fluorescent Probes Indicators for real-time ion concentration imaging.
- Calcium, Chloride and Other indicators Fluorescent indicators for intracellular ion flux monitoring.
- Mitochondrial Fluorescent Probes Targeted dyes for mitochondrial structure and function.
- Nitric Oxide (NO) & Reactive Oxygen Species (ROS) Probes for oxidative stress and signaling detection.
- Lysosomal Fluorescent Probes Acidic organelle markers for lysosome tracking.
- Fluorescent Probes Versatile tools for biomolecular and cellular imaging.
Explore More Topics
Online Inquiry
