

Common Problems in Fluorescent Labeling: Low Efficiency, High Background and Signal Instability
Fluorescent labeling can fail in ways that look similar on the surface but arise from very different causes. A weak image, an unexpectedly dim conjugate, rising background after washing, or a signal that fades during acquisition may all be described casually as "poor fluorescence," yet these outcomes often reflect different failure layers in the workflow. In some projects, the main problem begins at the labeling step itself, where the fluorophore never reaches the target efficiently or the chosen chemistry does not match the accessible functional groups. In others, the label is successfully installed, but downstream handling, cleanup, illumination conditions, or multicolor panel design make the final signal difficult to interpret. This is why troubleshooting fluorescent labeling requires more than repeating the same protocol with minor adjustments. It requires separating the symptom from the real source of failure.
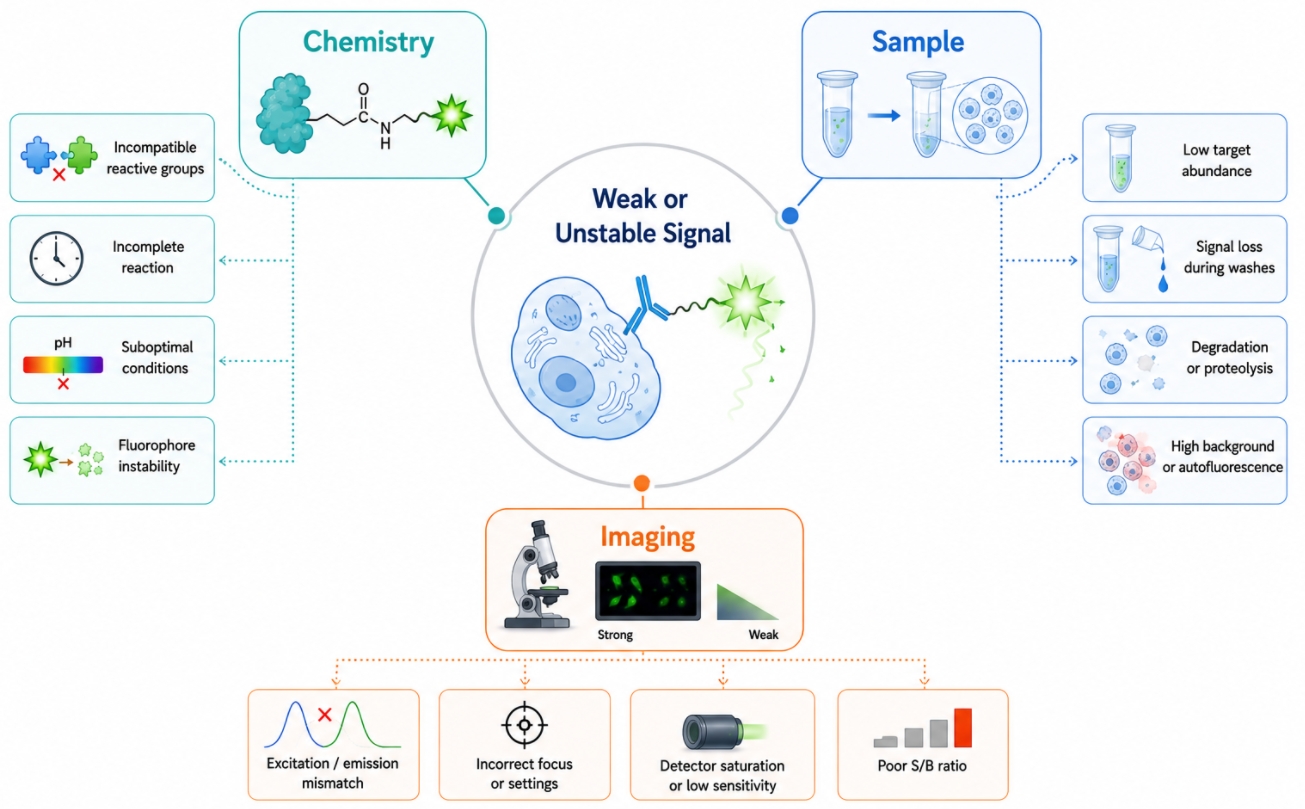 Fig. 1. Fluorescent labeling failures often arise from chemistry, sample handling, and imaging factors together (BOC Sciences Authorized).
Low efficiency, high background, and signal instability do not belong to the same category of technical problem. Low efficiency usually points to incomplete or poorly matched labeling, inaccessible targets, insufficient reactive compatibility, or signal capture that is weaker than expected. High background often reflects free dye carryover, nonspecific binding, sample autofluorescence, excessive labeling density, or spectral bleed-through. Signal instability is different again, because the fluorescent label may initially appear acceptable but lose reliability during washing, repeated illumination, storage, or multistep assay handling. A useful troubleshooting guide therefore needs to explain why fluorescent labeling problems are often misdiagnosed, connect each failure mode to its most likely chemical, sample-related, and imaging-related causes, and provide a practical optimization path that helps users decide what to change first, what controls to introduce, and how to rebuild the workflow when the root cause is not where it first appears.
Why Fluorescent Labeling Problems Are Often Misdiagnosed?
One reason fluorescent labeling workflows can be difficult to troubleshoot is that the final readout compresses many upstream events into a single visual impression. By the time a user sees a weak signal or a noisy image, the workflow has already passed through target preparation, labeling chemistry, fluorophore incorporation, cleanup, sample handling, and detection. The observed problem is therefore not always located where it appears. Good troubleshooting starts by recognizing that one symptom does not guarantee one cause, and that the same visible result may reflect different technical failures depending on the workflow design.
- One Symptom Can Reflect Several Different Failures: The same visible outcome can arise from very different underlying mechanisms. Weak fluorescence may indicate low labeling efficiency, but it can also result from poor target accessibility, low fluorophore brightness under the actual excitation source, or excessive bleaching before meaningful data are collected. Background signal may reflect unremoved free dye in one project, yet in another it may come from sample autofluorescence, secondary reagent accumulation, or channel overlap in a multicolor design. Signal instability may appear to be a dye problem even when the real cause is inconsistent sample preparation, variable illumination, or changes in acquisition settings between sessions. From a development perspective, this means troubleshooting should never begin with the assumption that the most obvious explanation is the correct one. It should begin by mapping the visible symptom to the possible failure layers that could generate it.
- Good Troubleshooting Starts with Signal Logic: Troubleshooting becomes more reliable when the fluorescent signal is treated as the output of a sequence rather than as a single event. The sequence typically includes target definition, labeling chemistry, fluorophore incorporation, removal of unbound material, sample processing, and signal acquisition. Each stage can either preserve or degrade the final readout. If the signal is weak immediately after labeling, the issue may lie in chemistry, target access, or fluorophore choice. If the signal looks acceptable at first but deteriorates after washing or fixation, the issue may lie in sample handling or target retention. If the signal appears clean in single-color testing but becomes confused in the full panel, the issue is more likely related to channel design or instrument settings. This signal-logic approach is useful because it reduces troubleshooting by trial-and-error and replaces it with a more structured diagnostic path.
- Optimization Is More Reliable Than Repetition: Repeating the same labeling workflow under nearly identical conditions rarely solves persistent problems. It can confirm that the failure is reproducible, but it does not identify which variable is responsible. More reliable troubleshooting comes from changing one meaningful factor at a time and observing how the failure pattern shifts. This may involve altering fluorophore loading, revisiting the conjugation route, improving cleanup, changing the blocking strategy, rebalancing the panel, or adjusting acquisition settings to match the dye more appropriately. For customers developing robust assays or reusable labeled reagents, this matters because the goal is not merely to recover a signal once. The goal is to establish a workflow that can be repeated with consistent performance and interpreted with confidence across future experiments.
Problem 1. Low Labeling Efficiency and Weak Signal
Low labeling efficiency is one of the most common causes of weak fluorescence, but it should not be reduced to a single explanation such as "not enough dye." In many fluorescent labeling workflows, weak signal reflects a mismatch between the target, the reactive chemistry, the fluorophore, and the detection system rather than a simple underdosing problem. The central troubleshooting question is whether the fluorophore failed to attach, failed to remain associated with the target, failed to survive subsequent handling, or failed to generate a strong enough signal under the real acquisition conditions. These possibilities need to be separated before optimization begins, because each one calls for a different correction strategy.
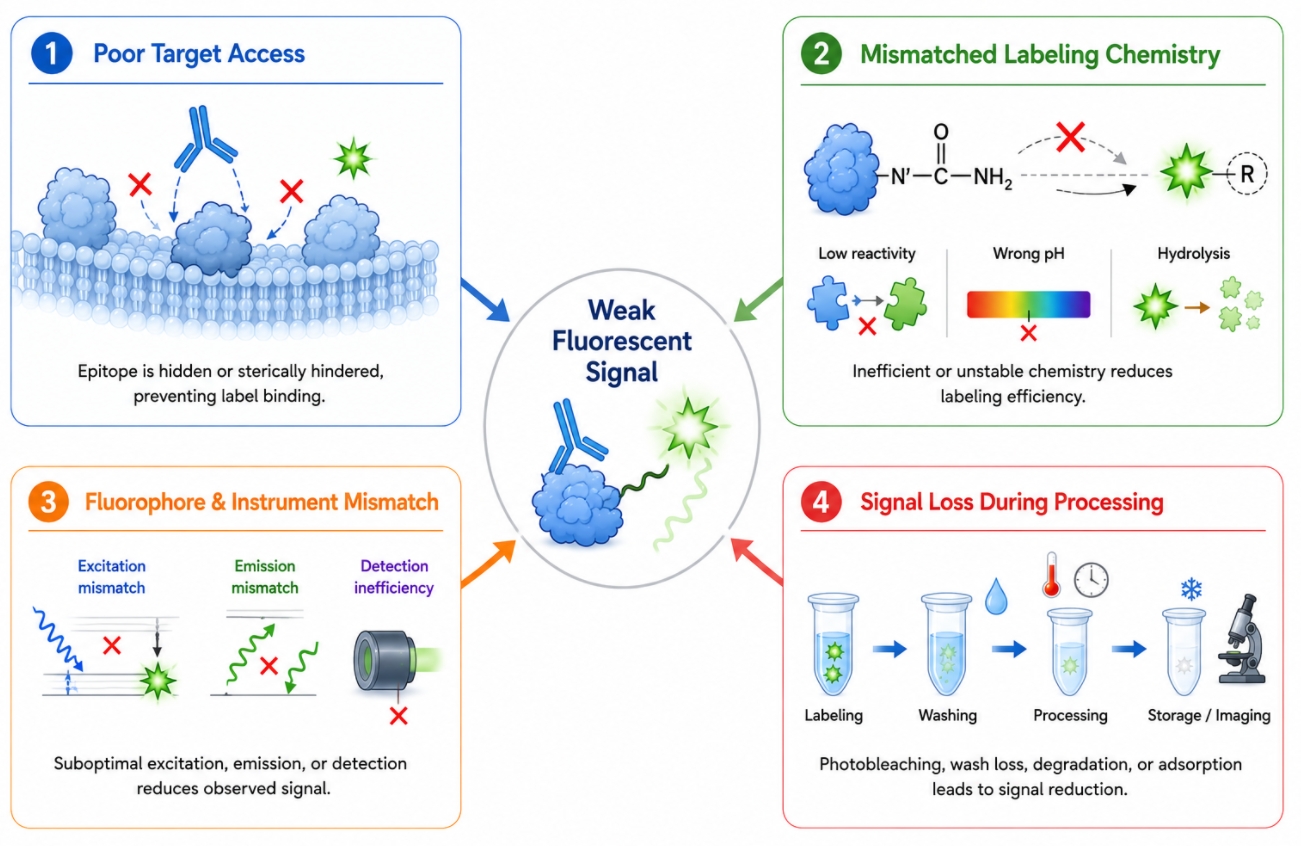 Fig. 2. Weak signal in fluorescent labeling can arise from several different failure points (BOC Sciences Authorized).
- Poor Access to the Target: Weak signal often occurs because the fluorophore cannot efficiently reach the target. In covalent labeling, reactive groups may be present but not sufficiently exposed. In antibody-based workflows, limited epitope accessibility, conformational masking, or unsuitable sample preparation can reduce effective labeling. For compact or highly structured targets, steric hindrance can further restrict access. In these cases, adding more dye or extending reaction time usually increases cost more than performance.
- Unbalanced Labeling Chemistry: Labeling efficiency depends heavily on whether the conjugation chemistry truly fits the target. A reactive fluorophore is not automatically a good match. Too many accessible sites can create heterogeneous products, while too few can lead to sparse or inconsistent labeling. Buffer incompatibility, reactive-group hydrolysis, incomplete conversion, or poor site control can all weaken signal. Reviewing whether NHS Esters, thiol-based routes, or Click Chemistry Reagents are appropriate is often essential for obtaining reproducible results.
- Fluorophore and Instrument Mismatch: Apparent low labeling efficiency may actually be an optical mismatch. If the excitation source is suboptimal, the detector captures only part of the emission, or the signal falls in a crowded channel, the readout may appear much weaker than the actual labeling level. This is common when fluorophores are chosen by familiarity rather than true platform compatibility. In some workflows, switching to a better-matched dye improves performance more than changing the labeling reaction.
- Over-Dilution and Under-Labeling: In some workflows, the fluorescent signal is simply too low to be useful. This may result from insufficient fluorophore-to-target ratio, low final labeling degree, or excessive dilution after conjugation. Although under-labeling may better preserve target function, signal can fall below the effective detection limit. Increasing fluorophore loading blindly, however, may create aggregation, higher background, or target disruption. The better approach is to determine whether the real limitation is reaction conversion, labeling density, working concentration, or instrument sensitivity.
- Signal Loss During Processing: A label may be installed successfully but still lose performance during downstream handling. Washing, fixation, permeabilization, purification, medium changes, and repeated transfers can all reduce retained fluorescence, depending on the target and fluorophore design. Some labels are not stable enough through the full workflow, while others become less detectable after environmental or structural changes. For this reason, signal should be assessed not only immediately after labeling but also after the key processing steps that define the actual assay.
Problem 2. High Background and Nonspecific Fluorescence
High background is often more damaging than moderately weak signal because it directly reduces contrast and makes it harder to judge whether apparent fluorescence reflects the intended target or simply a broad fluorescent haze within the system. In fluorescent labeling workflows, background can arise before, during, or after the labeling step. It may be generated by the fluorophore itself, by the sample, by incomplete cleanup, by binding architecture, or by spectral interactions in multicolor designs. Effective troubleshooting therefore depends on distinguishing true nonspecific fluorescence from optical overlap or sample-intrinsic background. This distinction matters because the corrective action is different in each case.
- Unbound Dye and Incomplete Cleanup: Residual free fluorophore is one of the most common causes of high background. In direct labeling workflows, unremoved dye can generate diffuse signal unrelated to the actual target. Even small residual amounts may be obvious when strongly fluorescent reagents are used. Incomplete cleanup can also leave partially reacted species that behave differently from the intended conjugate. A workflow that looks chemically successful may still fail analytically if purification is not sufficiently controlled.
- Nonspecific Binding in the Sample: Background may also arise when the fluorophore or fluorescent conjugate interacts nonspecifically with the sample matrix. High hydrophobicity, unfavorable charge, inadequate blocking, or sticky sample surfaces can all promote off-target accumulation. In antibody-based systems, secondary reagents and species incompatibility may worsen the problem. In direct conjugates, background may reflect altered interaction behavior after labeling. The key question is not only whether free dye remains, but whether the fluorescent reagent itself is inherently too prone to nonspecific association under the assay conditions.
- Autofluorescence and Matrix Interference: Not all background comes from the label. Some samples exhibit strong intrinsic fluorescence from endogenous molecules, media components, fixation artifacts, or material surfaces. This is especially relevant in tissues, complex matrices, and structured samples where background may vary by region or channel. Autofluorescence becomes more problematic when the chosen fluorophore occupies a heavily contaminated spectral range. In these cases, background control may require changing fluorophore family, imaging settings, or control strategy rather than modifying labeling chemistry alone.
- Excess Fluorophore Loading: Over-labeling can generate background even when target conjugation is technically successful. Excess fluorophore may increase hydrophobicity, promote aggregation, or drive nonspecific interactions, making the labeled population less distinct rather than more visible. A common mistake is to compensate for weak signal by increasing fluorophore loading, only to create a brighter but less interpretable system. Troubleshooting should therefore include checking whether the fluorophore-to-target ratio has already exceeded the useful range.
- Channel Bleed-Through in Multicolor Workflows: In multicolor workflows, apparent background may actually reflect spectral bleed-through rather than true nonspecific fluorescence. If one fluorophore emits strongly into the detection window of another, the overlap can look like diffuse background even though the source is a legitimate signal in a neighboring channel. This is especially common in crowded panels built fluorophore by fluorophore rather than as an integrated design. Single-color controls, detector review, and channel reassessment are often more effective here than simply increasing washing or blocking.
Problem 3. Signal Instability During Imaging and Analysis
Signal instability is often more difficult to troubleshoot than a consistently weak or consistently noisy result because it creates uncertainty about when the signal can be trusted. A fluorophore may appear acceptable during early acquisition but fade, drift, or vary across sessions in ways that make quantitative or comparative interpretation unreliable. These problems are especially common in workflows involving repeated illumination, long acquisition windows, multistep sample handling, or reuse of reagents across batches. The central troubleshooting question is whether the instability arises from the fluorophore itself, the assay environment, the sample-preparation sequence, or the acquisition settings used to observe the labeled target.
- Photobleaching Under Repeated Illumination: Photobleaching is one of the most common causes of signal loss during imaging. A fluorophore that appears strong initially may decline rapidly when repeated excitation exceeds its stability limits. This is especially important in time-lapse imaging, confocal scanning, repeated field acquisition, and other workflows requiring multiple exposures. Effective troubleshooting may require adjusting illumination intensity, exposure time, or scan frequency, not just switching to a more stable dye.
- Fluorophore Instability in the Assay Environment: Some signals become unstable because the assay environment itself affects fluorophore behavior. Local pH, oxidative conditions, solvent exposure, buffer composition, and target microenvironment can all alter fluorescence output. A fluorophore that is stable in storage or simple solution may behave differently once attached to a target or placed in a complex biological system. When signal changes correlate more with assay conditions than with illumination, the problem is likely environmental rather than purely optical.
- Inconsistent Labeling Across Batches: Batch-to-batch instability often reflects upstream inconsistency rather than imaging alone. Small differences in reaction timing, fluorophore concentration, target preparation, cleanup efficiency, or sample age can create conjugates that are nominally similar but functionally different in brightness or retention. This is especially important for customers who need reproducible labeled materials over time. In these cases, troubleshooting should focus on reaction standardization and process control rather than only on downstream detection.
- Signal Drift Across Acquisition Sessions: Apparent instability may also result from differences in acquisition conditions between sessions. Variations in exposure, gain, detector sensitivity, laser power, or field selection can create signal drift even when the labeled sample itself has changed little. This is especially problematic in longitudinal studies and shared-instrument environments. Standardized settings, internal references, and consistent acquisition logic are often necessary to separate real sample instability from instrument-driven variability.
- Unstable Readout in Multistep Workflows: In some projects, instability is caused by cumulative workflow burden rather than one isolated factor. Multiple washes, buffer changes, transfers, re-staining steps, fixation after labeling, or other downstream manipulations can all gradually alter signal consistency. A fluorophore that seems robust in a simplified test may become unreliable once the complete workflow is applied. This is why stability should always be evaluated under the actual process sequence used in the final assay, not only under ideal validation conditions.
Troubleshooting weak signal, high background, or unstable fluorescence?
We can help identify whether the problem comes from labeling chemistry, sample handling, fluorophore choice, or imaging conditions.
A Troubleshooting Workflow for Fluorescent Labeling Projects
A structured troubleshooting workflow helps convert fluorescent labeling problems into a manageable optimization process. Instead of jumping directly from weak signal to stronger fluorophore or from background to harsher washing, it is usually more effective to move through the problem in a defined sequence. This creates a clearer record of what was learned, what variable actually mattered, and whether the final improvement is likely to be reproducible. For customers developing robust labeling workflows, this sequence is especially important because it supports both technical correction and longer-term process reliability.
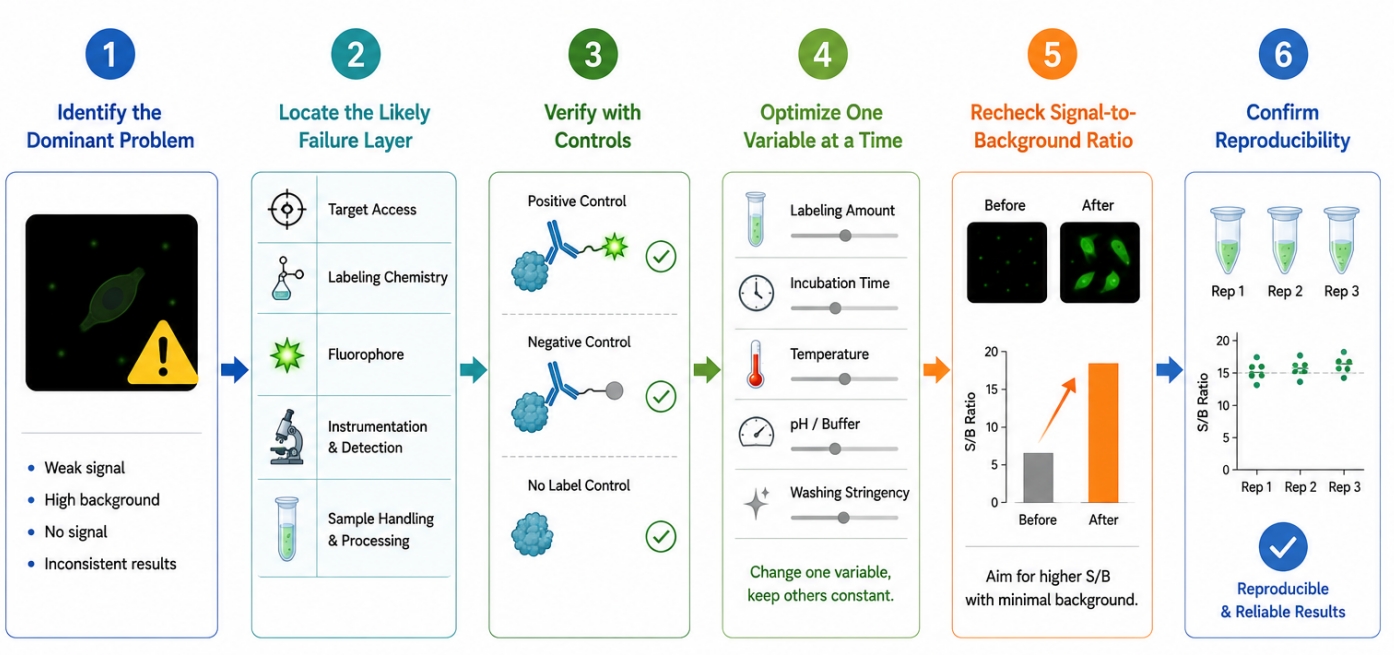 Fig. 3. A structured troubleshooting workflow improves fluorescent labeling optimization (BOC Sciences Authorized).
- 1. Define the dominant problem first. Decide whether the main issue is low efficiency, high background, rapid bleaching, unstable signal across replicates, or multicolor interference. The clearer the primary symptom, the easier it becomes to narrow the likely failure layer. This step should also include noting when the problem appears and whether it worsens over time or after specific workflow transitions.
- 2. Decide whether the problem is chemistry-, sample-, or imaging-related. Review where in the workflow the issue first becomes apparent. If the signal is weak immediately after labeling, chemistry and target access deserve priority. If the signal becomes problematic only after sample handling or acquisition, the root cause may lie elsewhere. This stage helps customers avoid unnecessary redesign of parts of the workflow that are not actually limiting performance.
- 3. Verify the suspected cause with controls. Use no-label, no-primary, single-color, or intermediate-stage checks to determine whether the problem is free dye, nonspecific binding, autofluorescence, bleed-through, or poor fluorophore retention. Controls are most valuable when they are chosen to expose the most likely failure layer. In practice, well-chosen controls often shorten troubleshooting far more effectively than repeated full-protocol runs.
- 4. Optimize one major variable at a time. Adjust fluorophore loading, reactive chemistry, cleanup conditions, wash stringency, blocking, or acquisition settings individually rather than simultaneously. This produces more useful troubleshooting information and prevents ambiguous improvements. For workflow development, this step is essential because it creates a traceable optimization history instead of a one-time success that cannot later be reproduced.
- 5. Re-check the signal-to-background ratio after each change. Do not judge success only by whether the signal looks brighter. Confirm whether contrast, specificity, and stability have improved together or whether one problem was merely traded for another. This is especially important in customer-facing development work, where a brighter signal is not meaningful if it also makes the final reagent less interpretable or less robust.
- 6. Confirm reproducibility before finalizing the workflow. Once the result improves, repeat the optimized conditions under realistic use scenarios to ensure that the gain is not a one-time event. For development projects, reproducibility is part of the solution, not a separate later concern. A troubleshooting fix should be considered complete only when it supports stable performance across repeated preparation or acquisition conditions.
How to Diagnose the Real Cause Before Optimization?
The most efficient troubleshooting begins with diagnosis, not adjustment. Many fluorescent labeling workflows accumulate changes too quickly once a problem appears, which makes it difficult to know which modification improved the result and which merely changed the symptom. A more reliable approach is to identify the dominant failure pattern, decide which workflow layer is most likely responsible, and then use controls or simplified comparisons to verify that assumption. This diagnostic phase is especially valuable for customers building reusable workflows or scalable labeled reagents, because it creates a more transferable understanding of the problem rather than a one-time fix tied to a single run.
1. Start with the Observed Failure Pattern
Troubleshooting should begin with the most dominant observable pattern rather than with a generic assumption about poor fluorescence. Weak signal, high diffuse background, rapid bleaching, inconsistent replicate brightness, and multicolor channel confusion are not equivalent phenomena. Each one points toward a different subset of likely causes. For customers working under limited sample availability, fixed project timelines, or high-value target materials, this first classification step can prevent unnecessary repetition of expensive preparation steps. Technically, the purpose here is to determine whether the failure is intensity-limited, contrast-limited, or stability-limited, because each category changes how the rest of the optimization should be prioritized. A weak but clean signal usually suggests one kind of workflow problem, whereas a bright but unstable or background-heavy signal suggests a very different one.
2. Separate Chemistry Problems from Imaging Problems
One of the most useful diagnostic distinctions is whether the problem originates at the labeling stage or at the acquisition stage. If the target is not being labeled efficiently, increasing detector gain, extending exposure, or using more aggressive image processing may only magnify noise and create the illusion of improvement. Conversely, if the conjugation is chemically sound but the fluorophore is poorly matched to the instrument, redesigning the labeling chemistry can waste time without correcting the real limitation. From a customer perspective, this distinction matters because chemistry troubleshooting often implies reagent reformulation, re-conjugation, or changes in target preparation, whereas imaging troubleshooting may instead require different filter selection, revised channel planning, or different acquisition settings. The earlier these two categories are separated, the easier it becomes to protect project resources and avoid redesigning the wrong part of the workflow.
3. Use Controls That Reveal the Failure Layer
Controls are most useful when they are chosen to expose a specific failure layer rather than added routinely without diagnostic intent. A no-label control can clarify whether sample autofluorescence is a major contributor. A no-primary control in antibody-based systems can distinguish true target-linked signal from secondary-driven or matrix-driven background. Single-color controls can reveal whether an apparent background problem is actually spectral bleed-through. Intermediate checks on the conjugate before full sample processing can show whether the fluorescent label is installed but later lost during handling. For customers developing service-ready assays or transferable labeling workflows, these controls are not just scientific formalities. They are decision tools that help determine whether the project needs a different fluorophore, a different reactive group, a different cleanup strategy, or a different acquisition design. Well-chosen controls reduce diagnostic ambiguity and shorten the path to a technically credible fix.
4. Change One Variable at a Time
Once the likely failure layer is identified, optimization should proceed by modifying one major variable at a time. Changing fluorophore family, reaction ratio, purification method, blocking conditions, and imaging settings simultaneously may occasionally improve the apparent result, but it makes it nearly impossible to determine what actually mattered. For customers who need reproducibility across future batches, that kind of improvement is fragile because it cannot be translated into a controlled workflow. Technically, one-variable-at-a-time optimization is important because fluorescent labeling systems often contain interacting variables: increasing labeling density may improve apparent signal but worsen nonspecific background; stronger washing may lower background but also reduce weakly retained true signal. Controlled sequential optimization makes it possible to see those trade-offs directly and build a final workflow that is not only improved, but also explainable and repeatable.
Practical Fixes for Better Signal-to-Background Performance
Once the dominant problem has been diagnosed, optimization should focus on improving the usable signal-to-background ratio rather than only increasing fluorescence intensity. A stronger signal is not automatically a better result if it is accompanied by more bleed-through, more nonspecific binding, or greater target disturbance. The most effective troubleshooting fixes therefore tend to improve contrast and interpretability together. From a development standpoint, this is the difference between recovering fluorescence and building a workflow that remains analytically dependable.
1. Improve Labeling Efficiency Without Overloading the Target
Signal recovery is often best achieved by improving labeling efficiency rather than simply adding more fluorophore. This may involve choosing a better-matched conjugation route, improving target accessibility, optimizing reaction conditions, or selecting a fluorophore with more suitable detectability on the intended platform. For customers developing labeled biomolecules, the practical goal is not maximum dye loading but a useful labeling density that preserves target behavior and yields consistent signal. Technically, this means paying attention to reactive-site availability, conjugation stoichiometry, hydrolysis sensitivity of reactive groups, and whether the final degree of labeling remains within a range that the target can tolerate without aggregation, altered binding, or loss of biological function. A moderate but well-controlled label density often delivers better long-term performance than aggressive over-labeling that appears brighter in the short term but destabilizes the reagent or complicates downstream interpretation.
2. Reduce Background Without Losing True Signal
Background reduction should be approached carefully because some methods that lower noise can also strip away meaningful signal. More stringent cleanup, improved blocking, and better removal of free dye are often useful, but the workflow should be checked to ensure that target-associated fluorescence is not being lost at the same time. From a customer perspective, this is especially important when the true signal is already limited by low target abundance, weak expression, or a narrow assay window. The technical challenge is to reduce nonspecific contributions selectively, which may require changing purification format, adjusting wash composition, or modifying sample-contact conditions rather than simply washing longer or harder. The best fix is usually the one that increases contrast without forcing the user to compensate for signal loss elsewhere in the workflow.
3. Choose More Stable Fluorophores and Cleaner Channels
In many problematic workflows, the most efficient fix is not a small protocol adjustment but a more suitable fluorophore. A dye with better photostability, cleaner spectral positioning, or lower background tendency may improve signal-to-background performance more than further tuning of the original label. This is particularly relevant in multicolor systems or longer imaging workflows where channel crowding and bleaching dominate the failure pattern. For customers deciding whether to continue optimizing an unstable reagent or redesign the labeling strategy, a fluorophore change is often justified when the original dye creates structural optical limitations that protocol refinement cannot fully overcome. From a technical standpoint, this means evaluating fluorophore families not only by nominal brightness but by how well they behave under the actual acquisition burden, sample environment, and channel architecture of the end-use assay.
4. Match Washing, Blocking, and Sample Handling to the Workflow
Sample handling can determine whether a technically good fluorescent label remains interpretable through the full workflow. Washing steps should remove unbound fluorescent material without stripping weak but meaningful target-associated signal. Blocking conditions should reduce nonspecific interactions without compromising access to the real target. Fixation, permeabilization, and transfer steps should be aligned with the retention logic of the labeling system. From a workflow-development standpoint, this means handling conditions should be considered part of the labeling design rather than a neutral downstream routine. Customers often see more stable improvement when sample handling is rebuilt around the fluorophore-target system itself instead of being borrowed from an unrelated fluorescence protocol. Technically, this often requires revisiting buffer composition, detergent exposure, ionic strength, surface-contact time, and the sequence in which sample-processing steps are applied.
5. Rebuild the Panel When Spectral Design Is the Real Problem
Some fluorescent labeling problems cannot be solved at the single-label level because the full panel architecture is the real source of failure. When overlap, bleed-through, compensation burden, or channel crowding dominate the final readout, incremental protocol adjustments may provide only limited improvement. In these cases, the more rational fix is to rebuild the spectral design by redistributing fluorophores, replacing one or more crowded channels, or prioritizing the most important readouts more explicitly. Although panel redesign requires more planning up front, it can prevent repeated troubleshooting cycles that never fully resolve a structurally poor multicolor layout. For customers scaling an assay, expanding marker coverage, or preparing a workflow for repeated use, panel redesign is often the more economical decision because it reduces future instability and lowers the cumulative cost of repeated partial fixes.
How BOC Sciences Supports Fluorescent Labeling Projects?
Fluorescent labeling projects often require more than choosing a fluorophore or completing a single conjugation step. In many cases, the real challenge is deciding which labeling route is most suitable for the target, how to preserve target performance after modification, how to control background and signal stability, and how to build a workflow that remains compatible with downstream detection and analysis. BOC Sciences supports fluorescent labeling projects through service capabilities that cover labeling strategy design, custom fluorescent conjugation, fluorophore and reactive-group matching, troubleshooting support, and project-oriented development assistance. Our goal is to help customers move from a general labeling concept to a more practical, more controlled, and more reproducible fluorescent labeling workflow.
Fluorescent Labeling Strategy Design
- Support for selecting suitable fluorescent labeling routes according to target type, including proteins, antibodies, peptides, nucleic acids, and other functional molecules.
- Comparative guidance across direct chemical labeling, antibody-based labeling, genetically encoded fluorescence, and click-enabled labeling workflows when different technical routes are possible.
- Assistance with deciding whether a project is better served by direct fluorophore attachment, reactive-handle installation, or more modular conjugation logic.
- Project-oriented planning that aligns labeling strategy with target behavior, workflow complexity, and downstream assay requirements rather than treating all routes as interchangeable.
Custom Fluorescent Conjugation and Labeling Development
- Support for developing custom fluorescently labeled biomolecules and related conjugates according to target structure, accessible functional groups, and intended research use.
- Flexible development options for amine-reactive, thiol-reactive, and click-compatible fluorescent conjugation workflows where better control over labeling structure is needed.
- Assistance with balancing fluorophore incorporation, signal intensity, and target integrity during conjugate development.
- Development support for projects that require more specialized fluorescent labeling architectures, including staged or modular labeling designs rather than only one-step attachment.
Fluorophore and Reactive Group Matching
- Support for matching fluorophore families, spectral regions, and reactive groups to the chemistry and analytical needs of the target system.
- Guidance on choosing among NHS ester, maleimide, azide, alkyne, tetrazine, and related labeling chemistries according to accessibility, selectivity, and workflow practicality.
- Assistance with selecting fluorophores for single-color or multicolor labeling workflows based on brightness, photostability, spectral separation, and platform fit.
- Better coordination between fluorophore properties and conjugation format so that optical performance and labeling feasibility are considered together.
Troubleshooting and Optimization Support
- Technical support for projects affected by low labeling efficiency, weak signal, high background, signal instability, or poor multicolor compatibility.
- Assistance with identifying whether performance limitations arise from target accessibility, reactive chemistry, fluorophore choice, sample handling, or imaging conditions.
- Support for improving signal-to-background performance through better reagent matching, cleaner labeling design, and workflow-specific optimization logic.
- More structured troubleshooting support for customers who need a reproducible fluorescent labeling solution rather than isolated experimental adjustments.
Do You Need A Consultation?
BOC Sciences helps troubleshoot fluorescent labeling workflows by reviewing signal loss, background sources, fluorophore fit, conjugation logic, and overall workflow stability.
Representative Fluorophores for Fluorescence Labeling Studies
| Catalog | Name | CAS | Inquiry |
|---|---|---|---|
| F01-0131 | 3,5-di(4-hydroxylphenyl)vinyl-BODIPYs | 1421836-97-6 | Bulk Inquiry |
| F01-0178 | BODIPY TR Cadaverine | 217190-24-4 | Bulk Inquiry |
| F01-0157 | Dipyrrometheneboron difluoride | 138026-71-8 | Bulk Inquiry |
| F01-0153 | Pyrromethene 556 | 121461-69-6 | Bulk Inquiry |
| F02-0116 | Cy5 dimethyl | 54268-70-1 | Bulk Inquiry |
| F04-0038 | Fluorescein diacetate | 596-09-8 | Bulk Inquiry |
| A17-0002 | Coumarin 314 | 55804-66-5 | Bulk Inquiry |
| F08-0011 | 1-Pyrenebutyric Acid | 3443-45-6 | Bulk Inquiry |
| F04-0029 | 6-Carboxyfluorescein dipivalate | 192374-17-7 | Bulk Inquiry |
| F07-0023 | 5-(6)-Carboxytetramethylrhodamine | 98181-63-6 | Bulk Inquiry |
| F02-0043 | CBQCA Reagent | 131124-59-9 | Bulk Inquiry |
| F02-0131 | Indocyanine Green | 3599-32-4 | Bulk Inquiry |
| F02-0109 | Cyanine3 dimethyl | 25470-94-4 | Bulk Inquiry |
| F04-0021 | Fluorescein-PEG5-acid | 2183440-40-4 | Bulk Inquiry |
| F07-0027 | TAMRA-PEG4-methyltetrazine | 2163772-19-6 | Bulk Inquiry |
High-Performance Fluorescent Tools for Your Research
- ICG Dyes Near-infrared imaging and in vivo diagnostics.
- Cyanine3 Standard green-orange fluorescent biomolecular labeling.
- Pyrene Dyes Environmental polarity sensing and membrane studies.
- Fluorescent Dyes General-purpose labeling for bioanalytical detection.
- sulfo-Cyanine7.5 Hydrophilic NIR probe for bioimaging.
- ATTO Dyes High-performance fluorophores for super-resolution microscopy.
- Fluorescein FAM Green fluorescence for nucleic acid labeling.
- Cyanine5.5 Far-red fluorescence for deep tissue imaging.
Explore More Topics
Online Inquiry
